


Зачем нужен аккаунт на Viva-Games?
Пользователи, у которых есть аккаунт, могут сохранять игровой процесс на сервер в любой игре и создавать списки игр (как на Youtube, например).
Создание аккаунта абсолютно бесплатно и займёт всего минуту Вашего времени.
Для создания аккаунта просто кликните в блоке "Войти на сайт" иконку социальной сети, в которой у вас уже есть активный профиль и следуйте подсказкам.
Мы в соцсетях


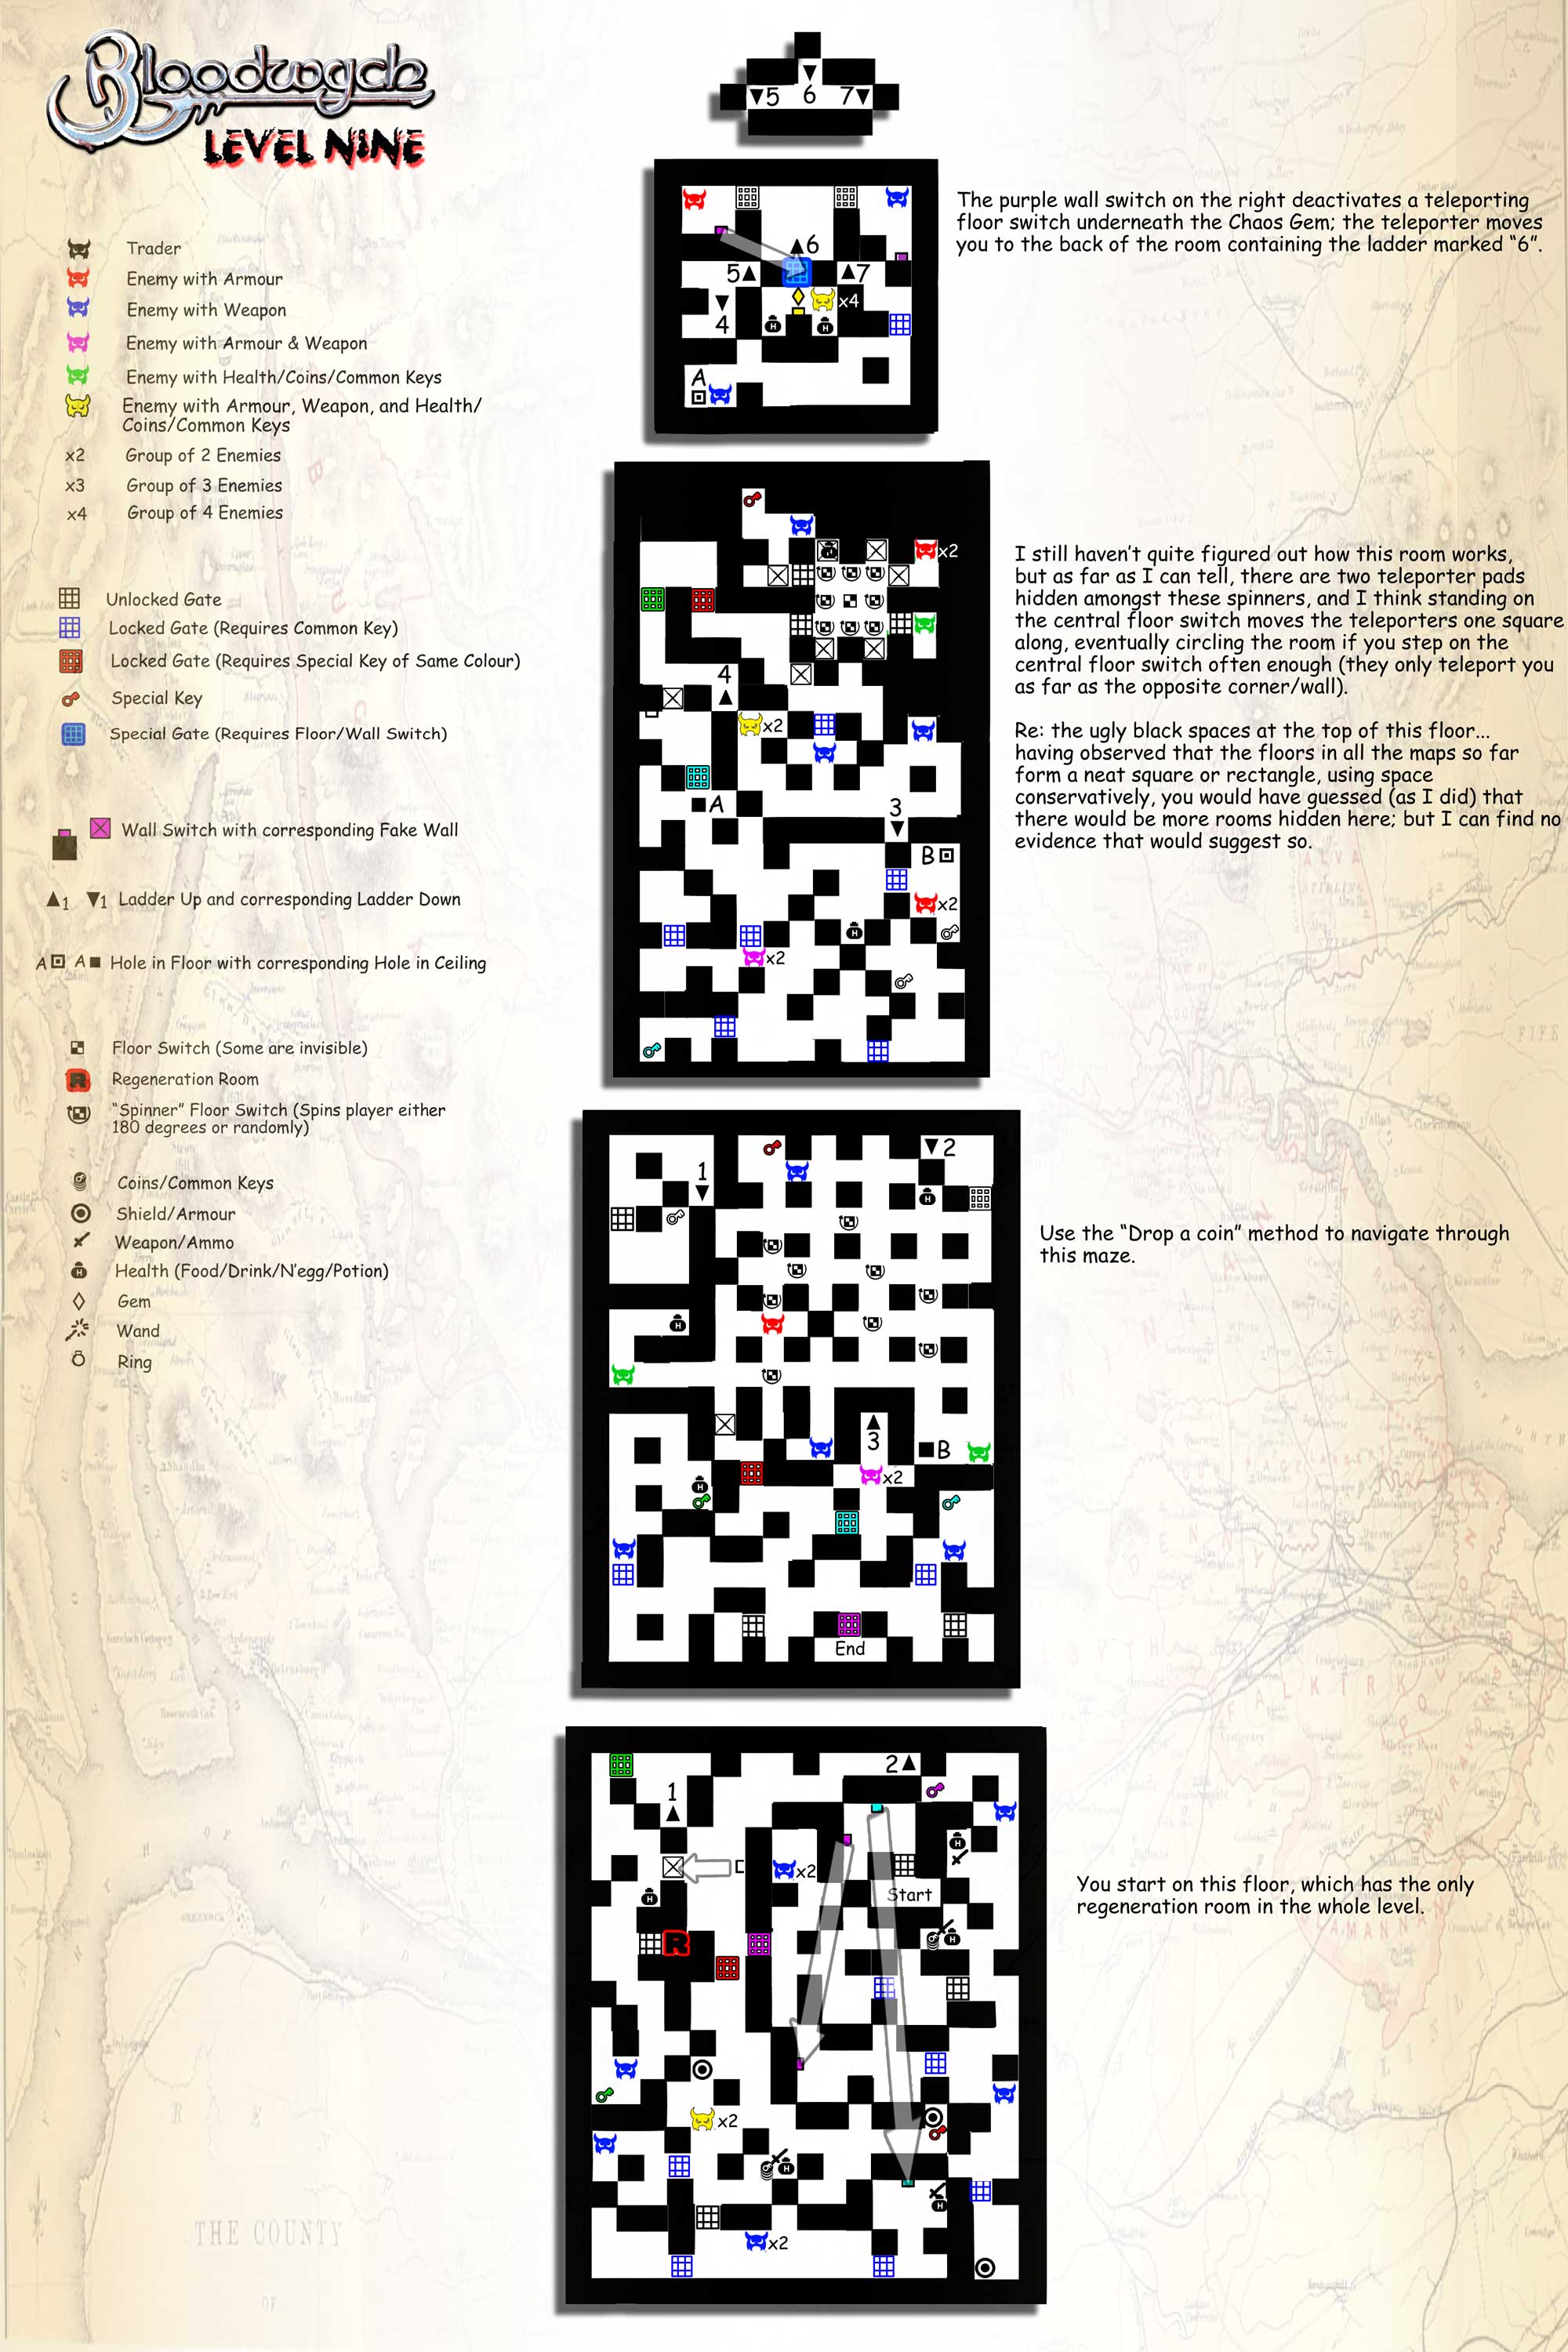
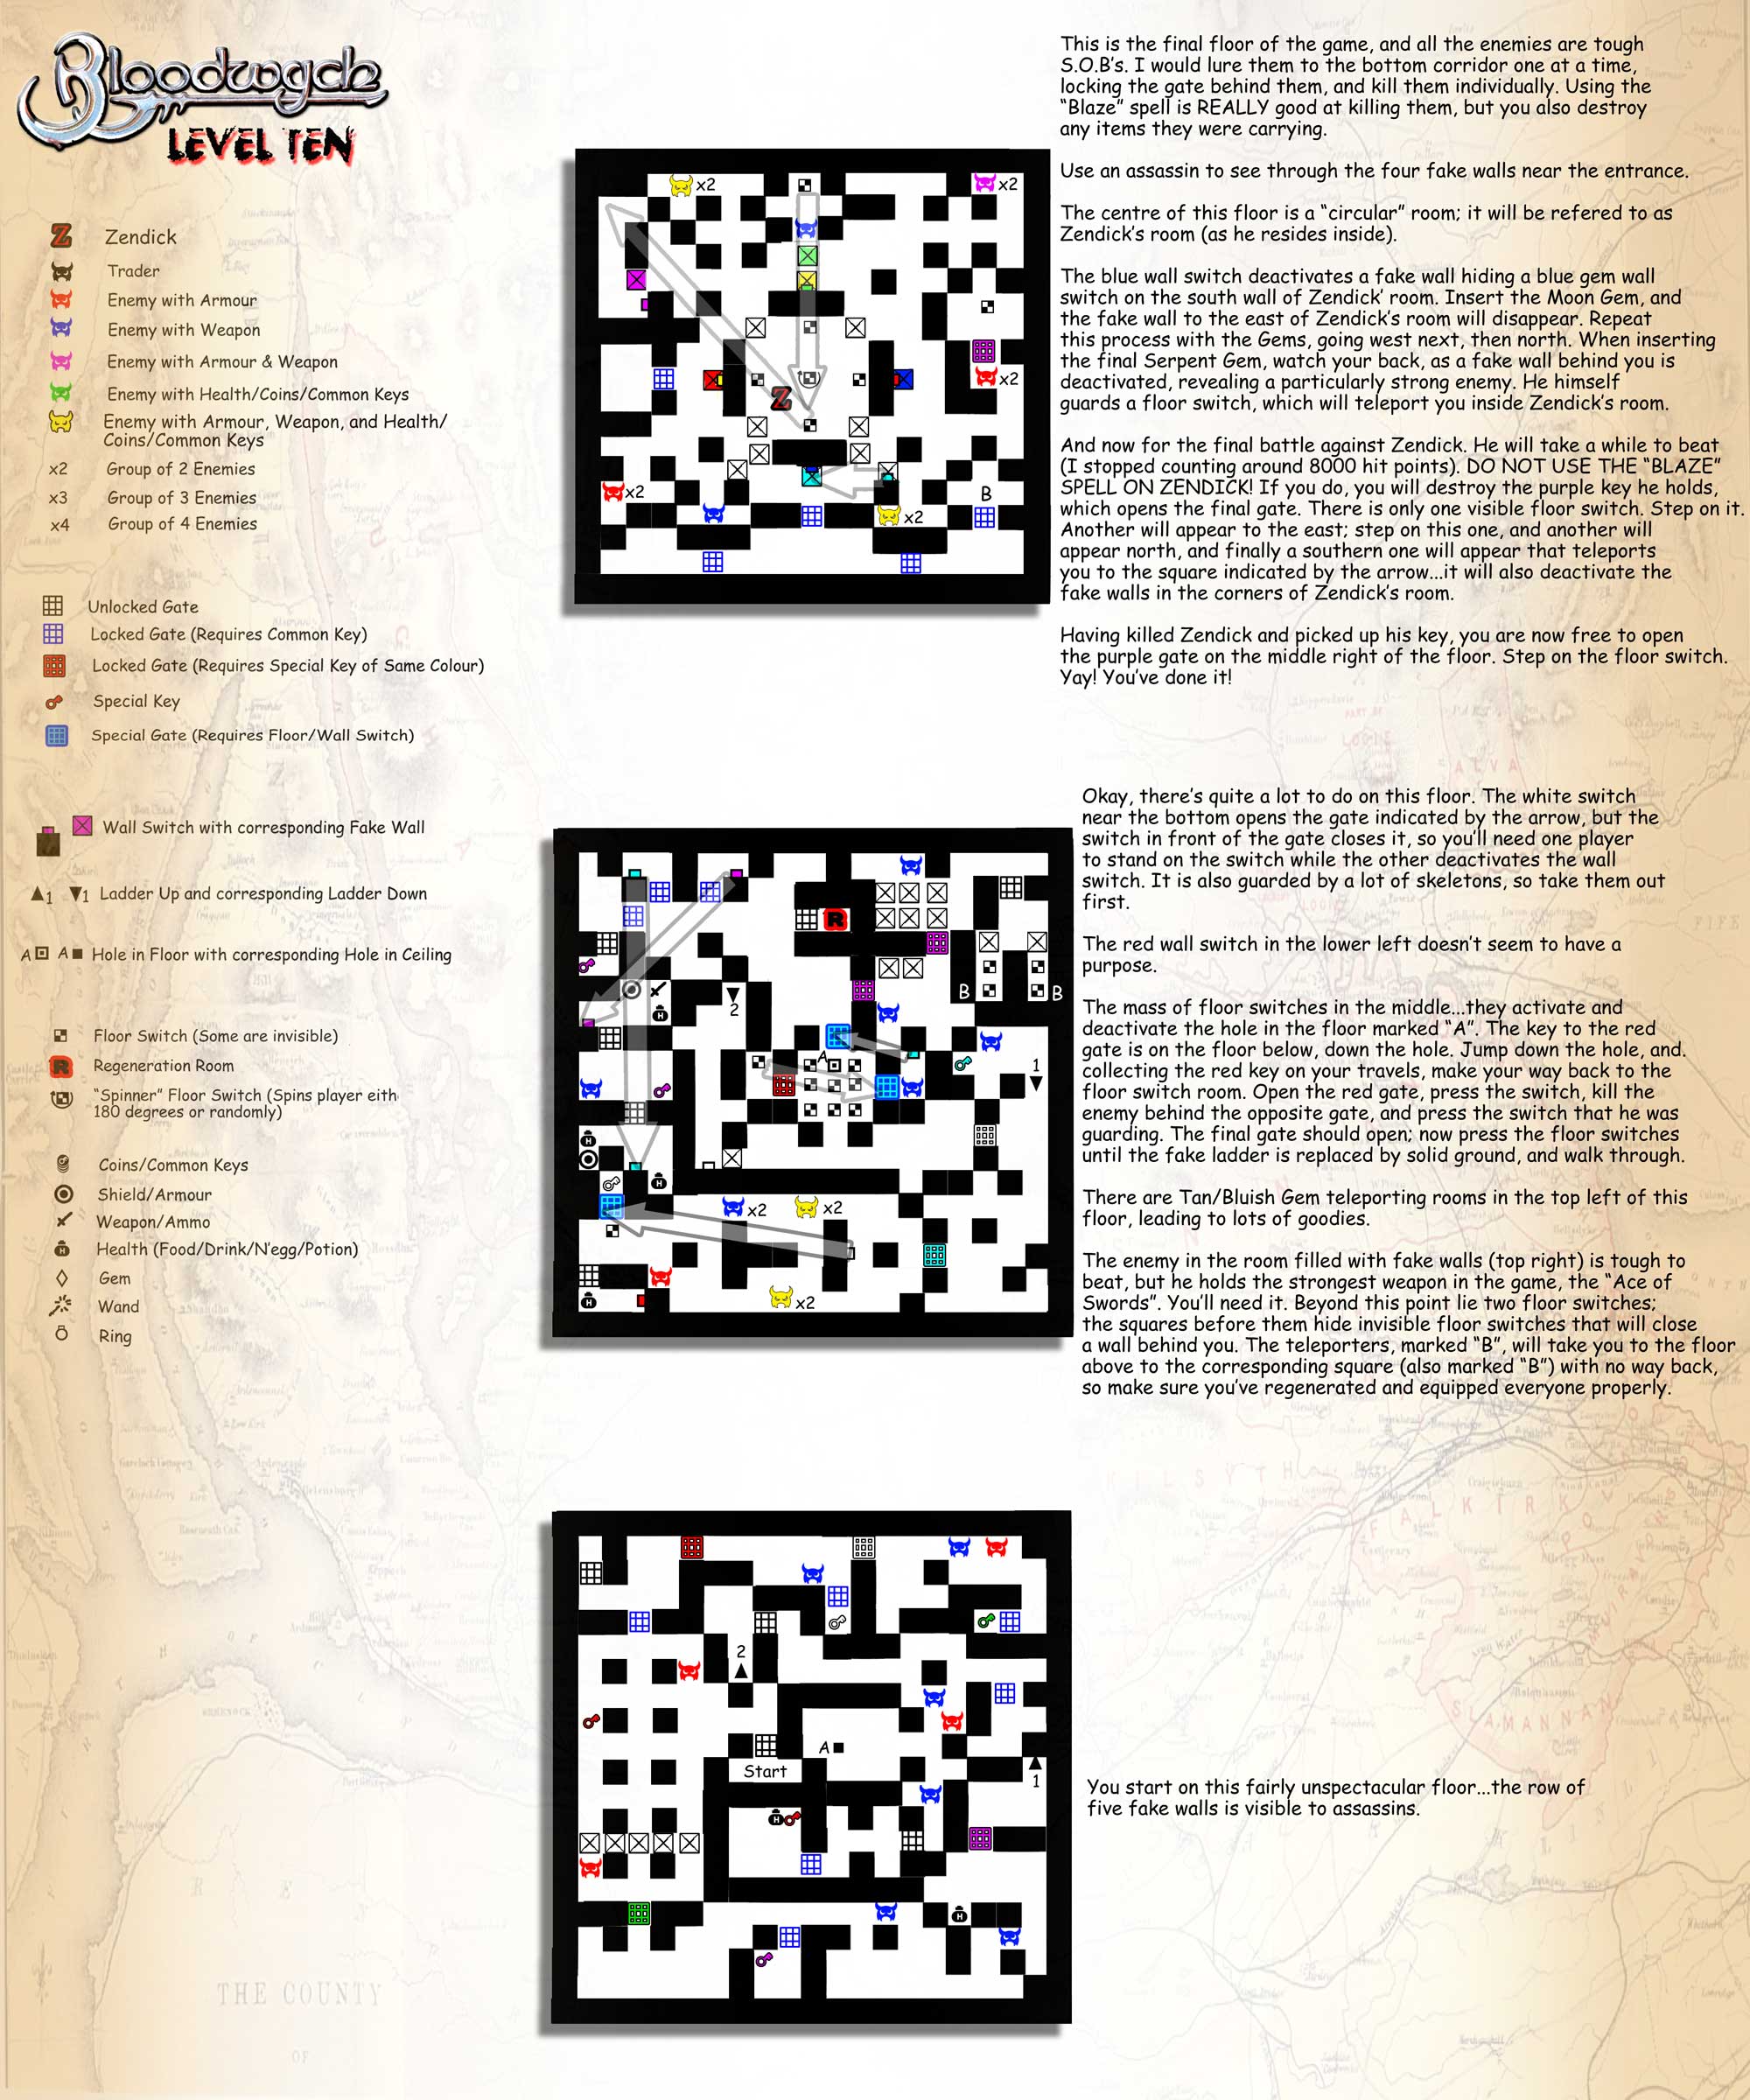
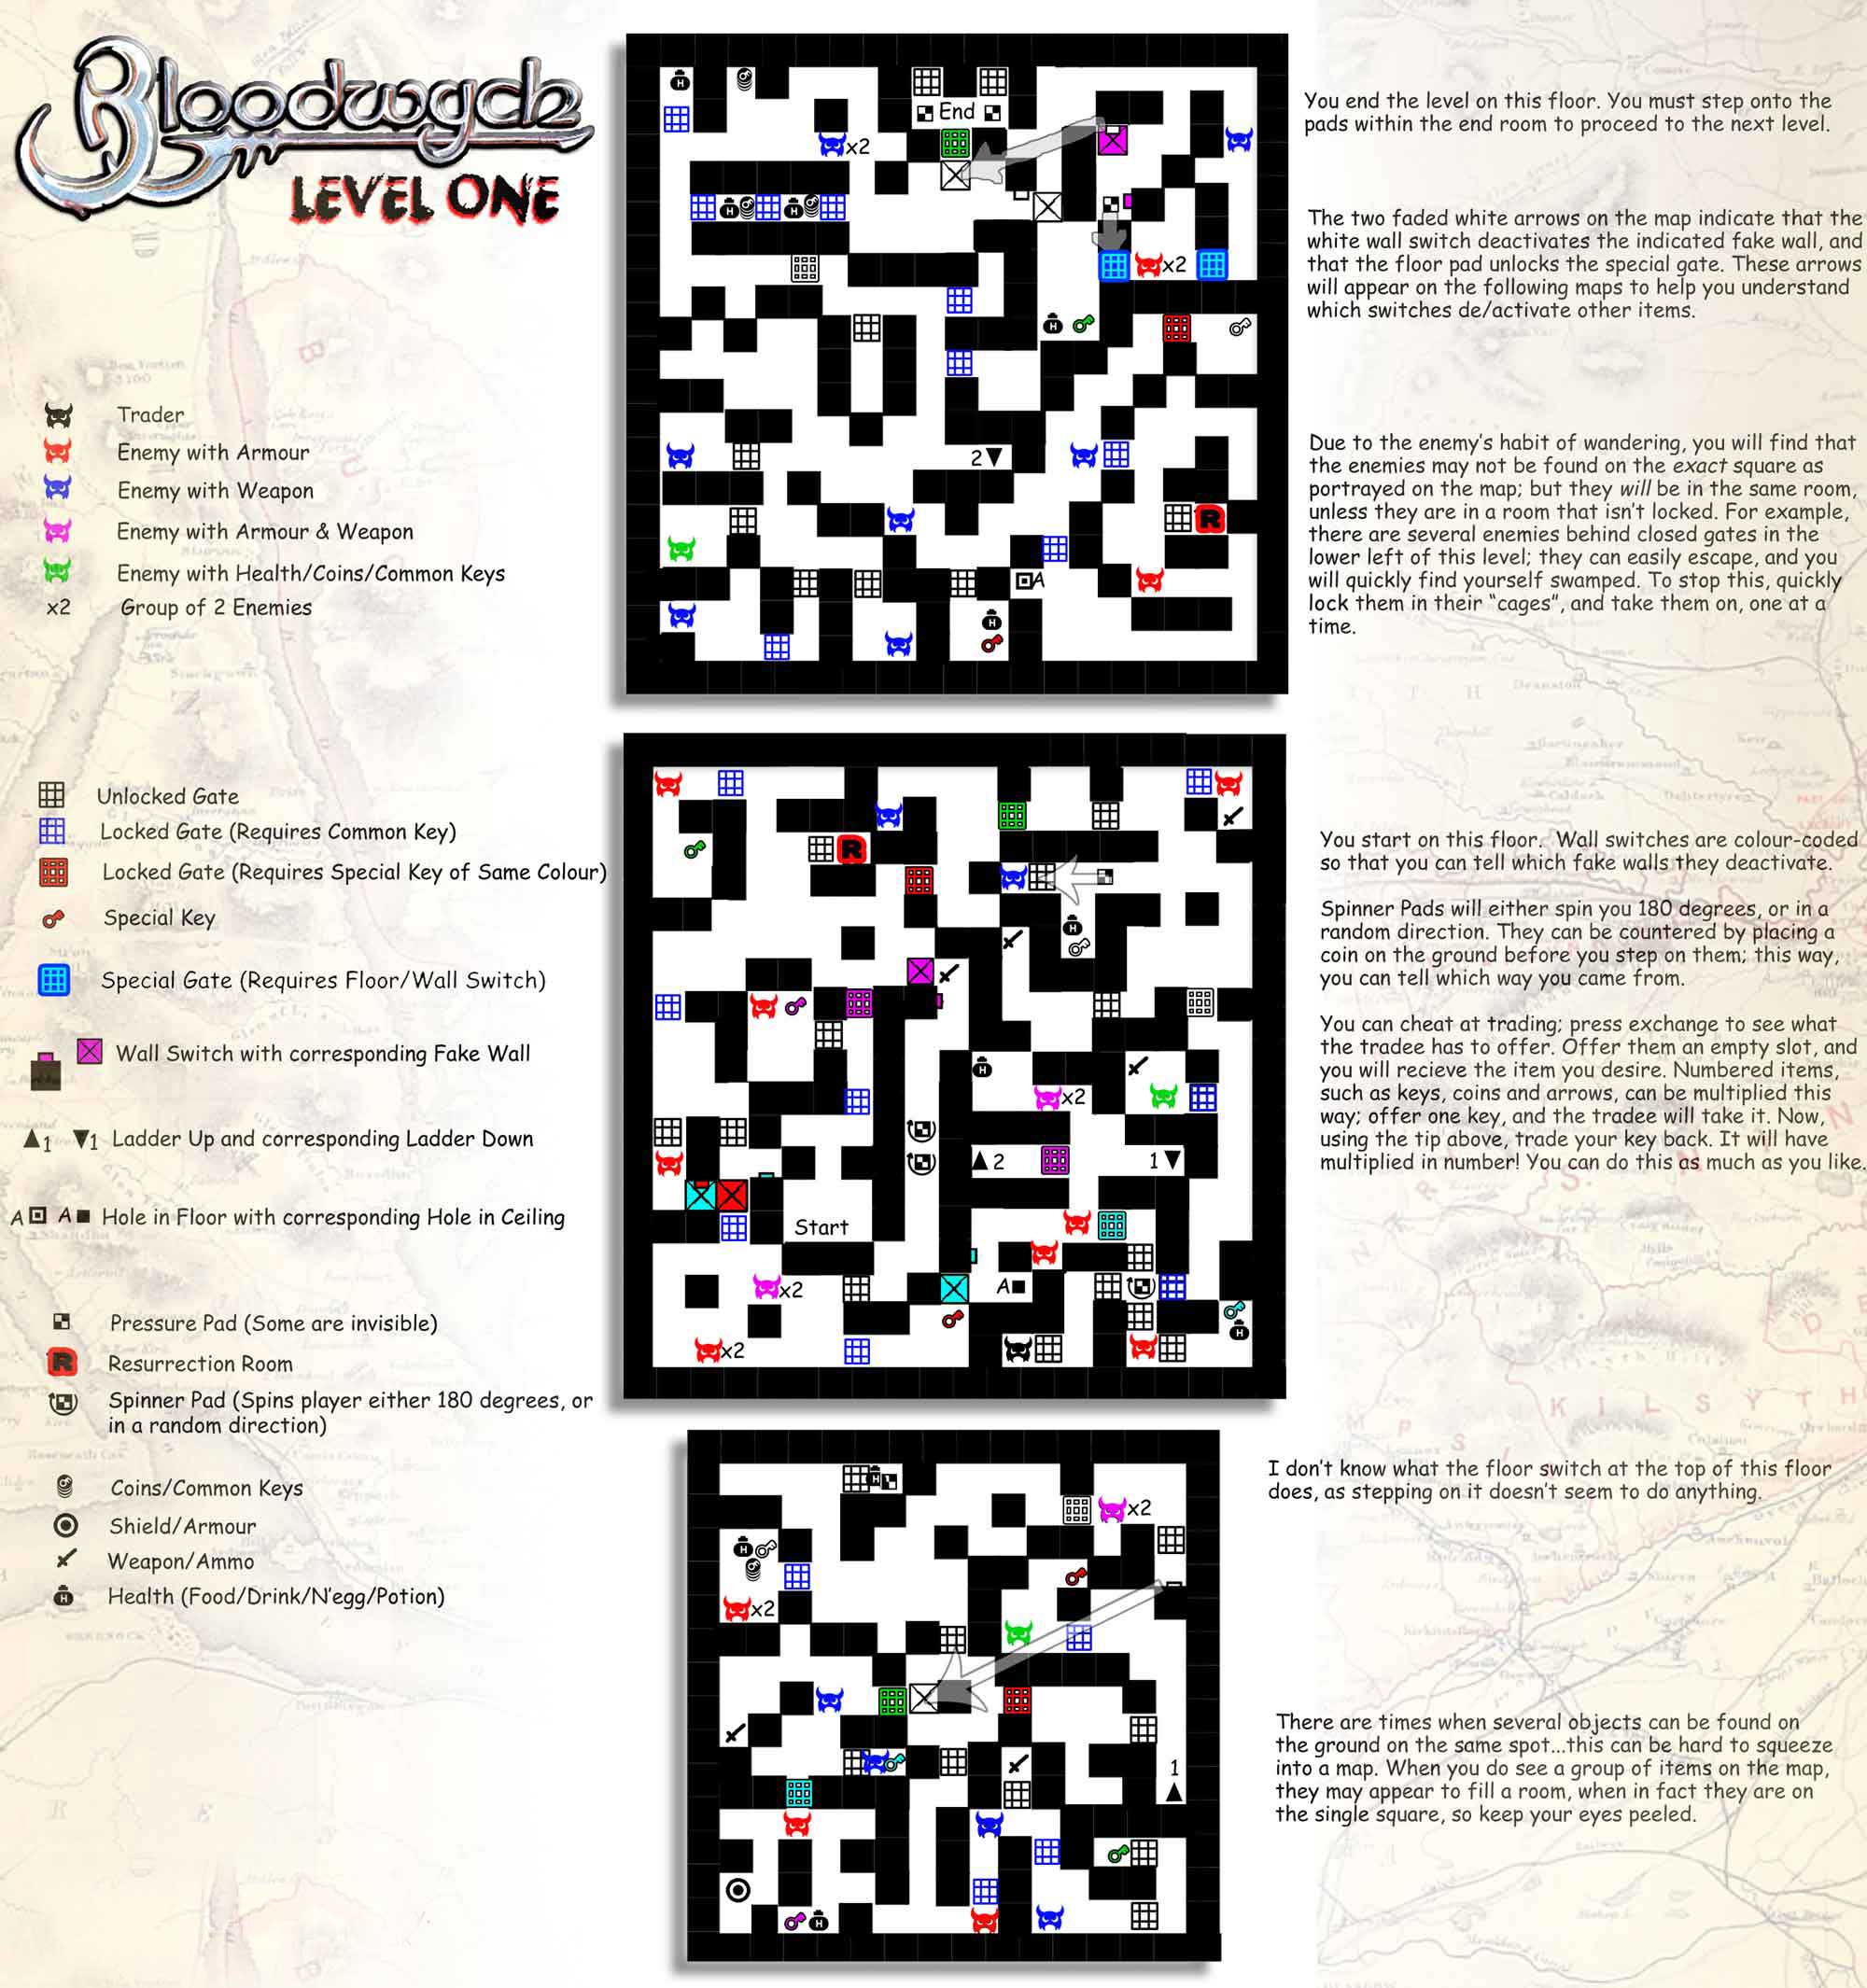
Bloodwych
https://viva-games.ru/game/bloodwychImage Works (Великобритания), 1990
Авторы: Philip Taglione, Pete James, Anthony Taglione
Жанр: Ролевые игры-RPG
Язык
- Русский
- English
Управление
- Клавиши на выбор(?)
Максимум игроков
- Два
Рассказать друзьям
Доступные версии
Доступные версии
- Аннотация
- Описание (пер.)
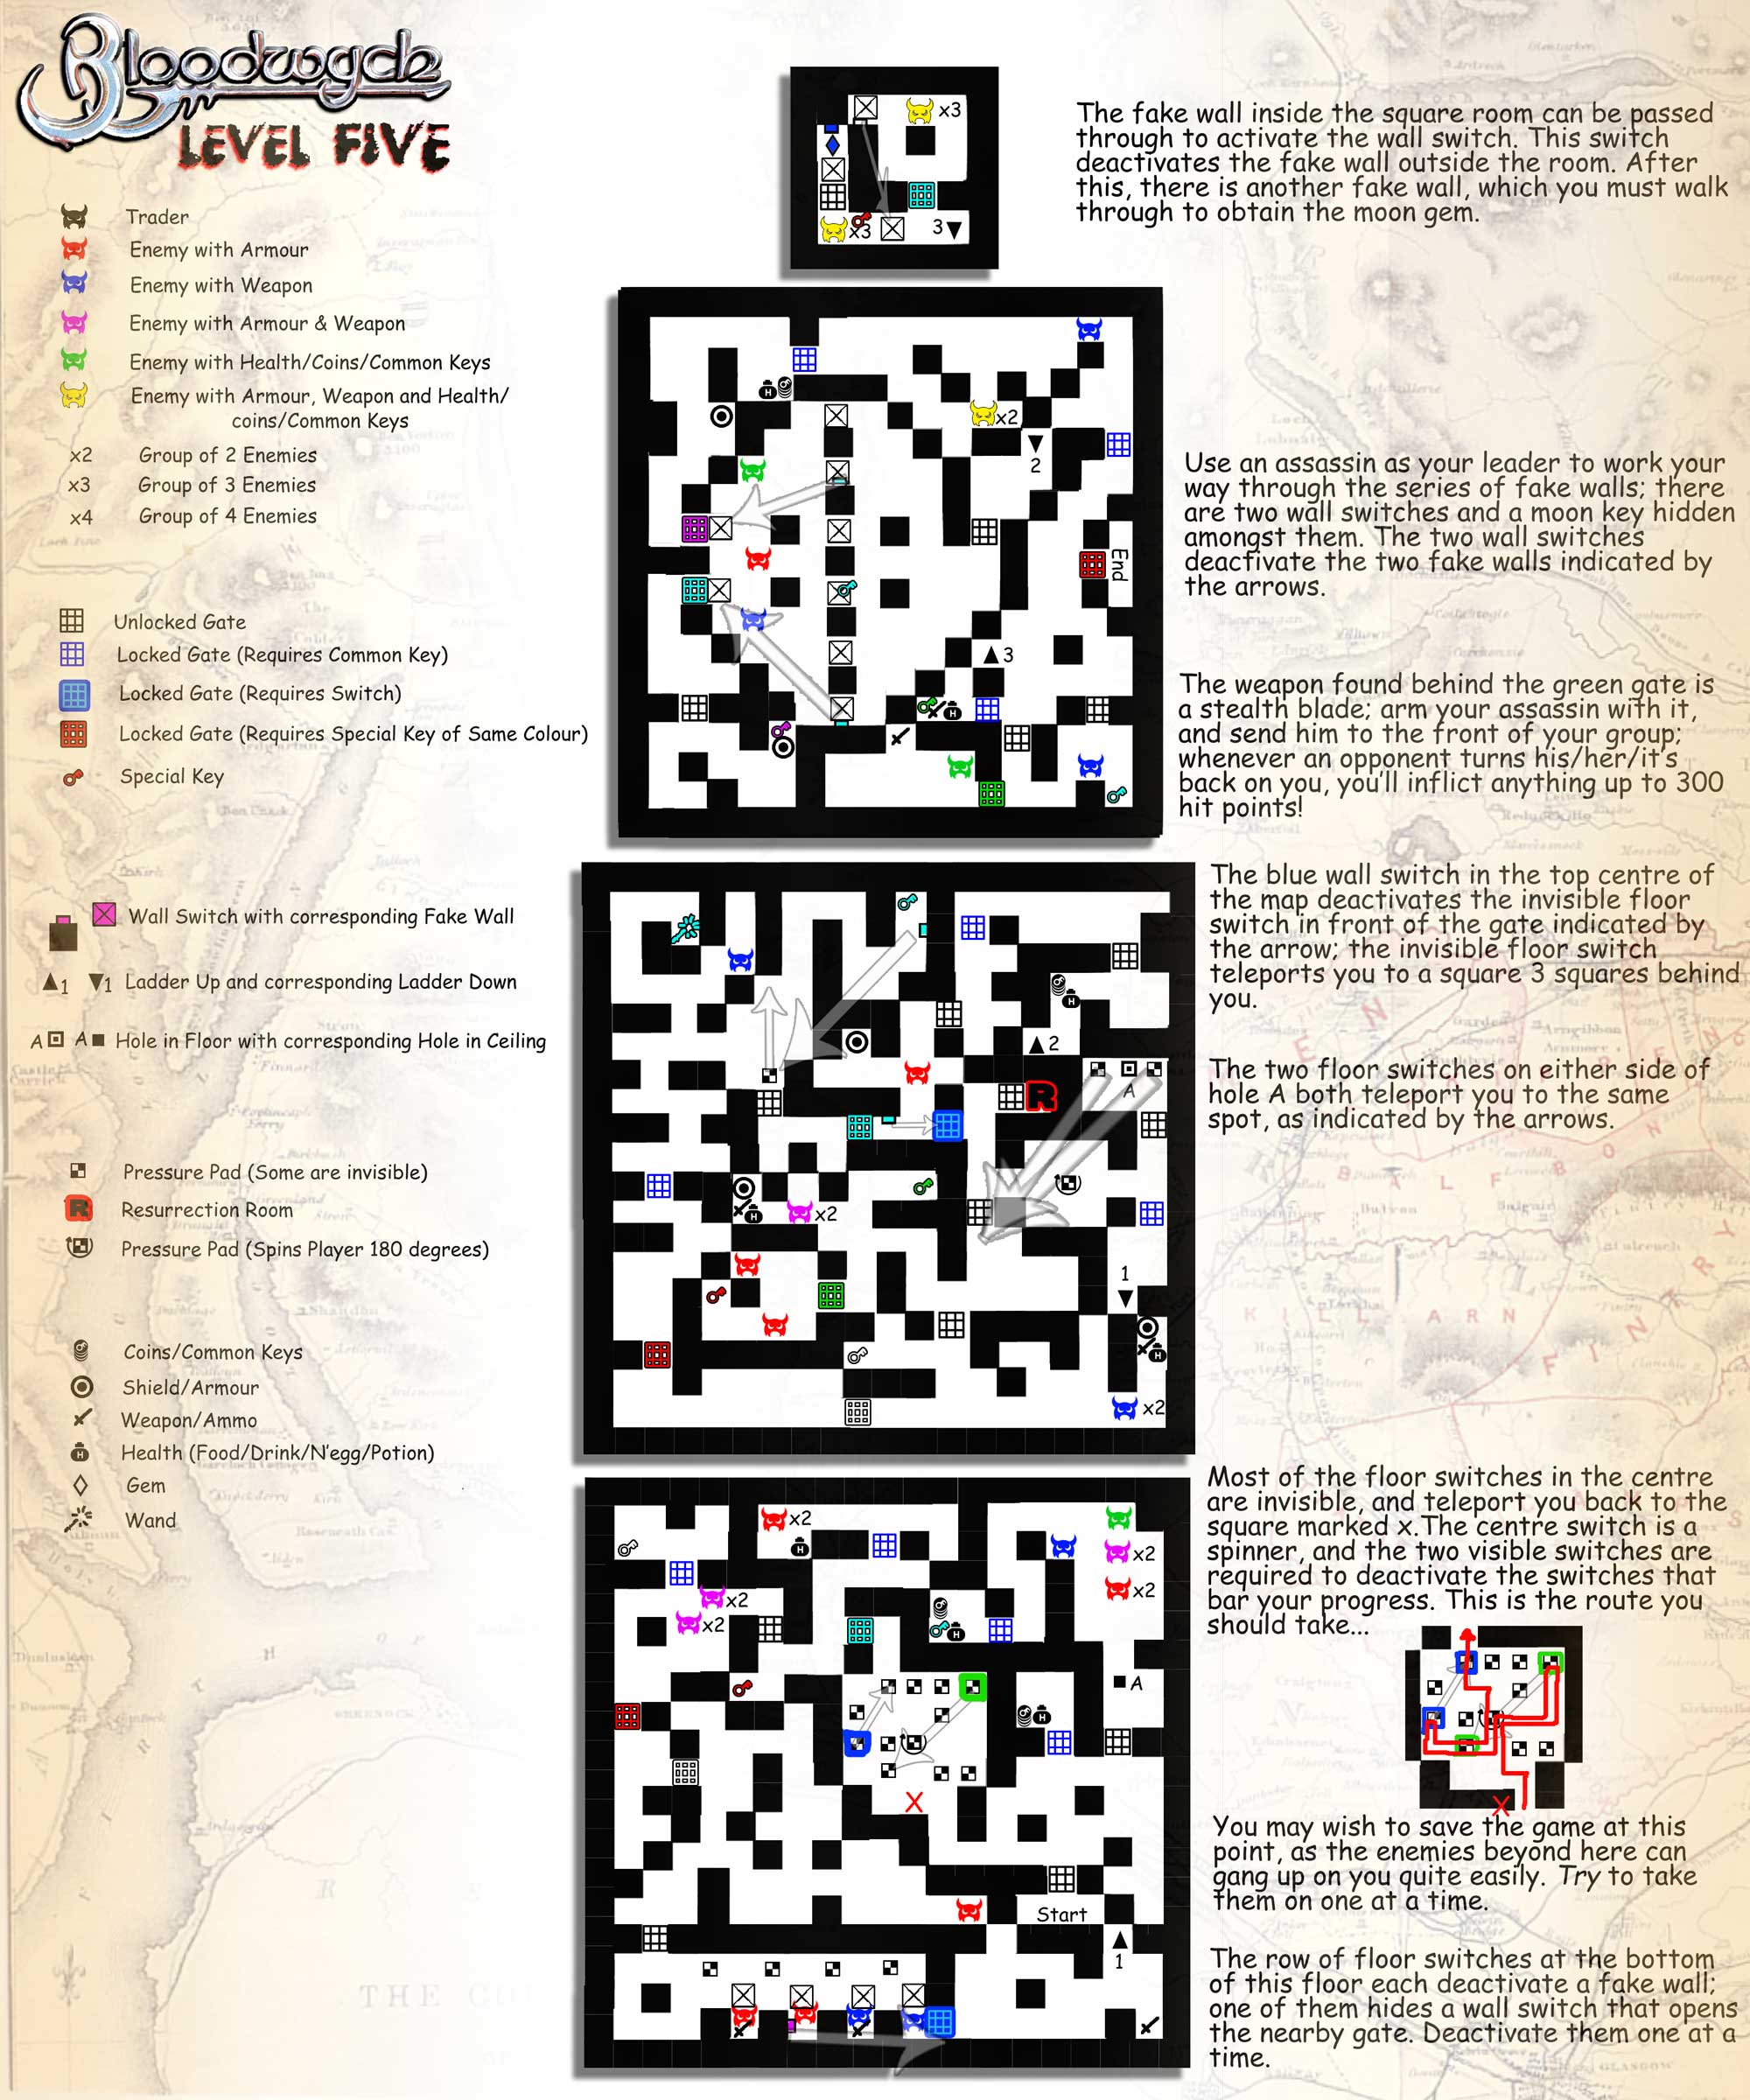
- Карта игры
- Карта игры
- Карта игры
- Карта игры
- Карта игры
- Карта игры
- Карта игры
- Карта игры
- Карта игры
- Карта игры
- Карта игры
- Карта игры
- Карта игры
- Информация
- Аннотация
- Описание (пер.)
- Описание
Сложная приключенческая игра. Исследуйте Трейхадвил, нанимайте чемпионов и собирайте предметы. Ваша задача – взять четыре кристалла-аккумулятора из башен, победить агентов Зендика и покончить с Повелителем Энтропии. Вас ожидают сложные системы взаимодействия персонажей, заклинания и бои, а также простая система значков. Будьте осторожны с жителями, многие из них стали монстрами. Удачи в вашем путешествии!
Bloodwych
Spectrum, amstrad, commodore
Инструкции
BLOODWYCH – это сложная приключенческая игра, которая использует все самые передовые возможности вашего компьютера. BLOODWYCH потребовалось много времени и усилий. Уникальный опыт компьютерных приключенческих игр, включающий в себя:
* Продвинутая система взаимодействия персонажей, которая позволяет вам полностью общаться с другими существами и людьми в игре.
* Сложные системы заклинаний и боя, которые повышают реалистичность игры.
* Простая в использовании система значков.
* Трехмерное зрение.
* И многое другое…
Этот буклет содержит полную информацию и инструкции по игре в BLOODWYCH, позволяя вам быстро начать и получить удовольствие от игры. В конце буклета вы найдете несколько советов о том, как получить максимальную отдачу от BLOODWYCH. Это поможет вам с легкостью освоить более сложные аспекты игры. Теперь перейдите на следующую страницу, потому что ваше приключение начинается…
Инструкции по погрузке
Commodore C64 (128 в режиме 64)
Диск: Введите LOAD “*”,8,1 и нажмите RETURN.
Лента: Для загрузки одновременно нажмите клавиши SHIFT + RUN STOP.
Amstrad CPC
Диск: Для загрузки введите RUN “DISC.
Лента: Для загрузки введите 1 TAPE (на компьютерах с дисковыми накопителями). Одновременно нажмите клавиши CONTROL + ENTER.
Спектр
Диск + кассета (128 К). Выберите опцию LOADER в меню заголовка. Игра запустится автоматически.
48 K: Чтобы загрузить, введите LOAD”” и нажмите ENTER.
Легенда о Кровопийце
Среди жителей Тразерии издавна принято пересказывать самые древние легенды. Например, Бладвич, тайный орден магов-экстрасенсов. Говорят, что много веков назад в древнем и могущественном городе Трейхадвил правил орден Бладвича. Там они тайно управляли делами земли Тразер, наказывая и награждая ее жителей и общаясь от их имени со стихиями. На протяжении многих веков народ Тразера жил в уважении к Бладвичу, ибо пока он правил, земля была в безопасности. В безопасности, то есть до черного рассвета задолго до зачатия прапрапрадедушки вашего дедушки.
Тогда среди Кровавых был Зендик, уступавший по силе и мистическому искусству лишь Великому Дракону. Но при всей своей силе и мудрости Зендик был существом, движимым амбициями и жадностью. Его не устраивала жизнь в тени повелителя чародеев, поэтому он отверг законы Бладвича и обратился к черным и злым искусствам. После долгих лет дьявольских заговоров Зендик наконец был готов нанести удар, о котором давно мечтал, и в тот день он созвал силы тьмы и уничтожил Великого Дракона, предводителя Бладвиха.
Их собратья по крови были не готовы к такой жестокой атаке и не смогли противостоять Зендику, который навсегда изгнал их на астральный план. Говорят, что злой смех Зендика был слышен по всей земле на рассвете. Весь день и ночь слышался его смех, а на следующий день небо потемнело, пролился кровавый дождь, и земля разверзлась, и многие из добрых жителей Тразерии никогда больше не были услышаны.
Рассказывают, что в последующие луны Зендик призвал в Трейхадвил множество ночных существ, и добрые люди не смели выходить на улицу после захода солнца. И постепенно город волшебников преображался. Существа появлялись на его стенах и запретных башнях и сбрасывали внутрь большие кристаллы, которые медленно поглощали энергию и жизненные формы Земли. С помощью этой энергии Зендик попытался вызвать Владыку Энтропии, воплощение чистого хаоса, который растворит вселенную в элементах, из которых она была сформирована. Тогда один Зендик смог бы воссоздать мир по своему образу и подобию. Хаос не оставит ничего, кроме кристаллов, из которых он был рожден.
С каждым годом земли Трейхадвила становились все пустыннее и холоднее. Сам город, казалось, излучал зло, заражая всех, кто поддавался его влиянию. Тразер и его жители были лишь тенью того, чем они когда-то были, и рождение каждого ребенка и сбор урожая стали поводом для скорби, а не для ликования. Однажды большая толпа, вооруженная лишь своей решимостью, вошла в город с намерением покончить с чумой, которая разрушила их жизни. Вернулись только мужчины, полуголодные, с обожженной плотью и голые. Они едва успевали назвать ужасы, которые видели, прежде чем последний вздох покидал их тела, и их души присоединялись к душам погибших товарищей.
Сейчас, когда я пишу эту страшную историю, я не нахожу больше причин жить. Болезни и отчаяние пронизали землю, и удовольствие от жизни, которое было у наших отцов, никогда не получат их дети. Остается только молиться. Молитесь о том, чтобы однажды Бладвич вернулся и отомстил за нас.
Гельвет Шарпквиль, писец. Написано его собственной рукой в этот тринадцатый день Сета, в год четыре тысячи восемьдесят первый от тьмы.
… Где-то, глубоко в царстве душ, вырисовывался разум, манящий к себе своих спутников. Незаметно, как ветер, собрались духи многих людей. Хотя они были бесформенными, их разумы были скованы вместе и делились друг с другом своими мыслями. Не было произнесено ни слова, ни звука, но в астральной пустоте возникла мысль.
“Мы – Бладвич, бессмертные волшебники в поисках света. Братья, мы не должны быть побеждены. Темная магия Зендика стала слишком велика. Он должен быть уничтожен, и время пришло. Влияние Зендика стало слишком сильным. Владыка Энтропии накапливает свою силу, и очень скоро начнется чума его уничтожения. Если мы не вернем его в царство хаоса, все будет потеряно…”.
“Салдар и Вестрил, вам поручено самое важное задание, которое когда-либо было у Бладвича. Вы должны найти шестнадцать последних чемпионов Тразерии и объединить свои умы с двумя самыми храбрыми. Затем, чтобы спасти вселенную, вы должны привести их к сердцу Трейхадвила и там найти и уничтожить кристаллы-аккумуляторы. Иди, и дух Бладвича будет с тобой…”.
Мурлок Темное Сердце проснулся во мраке холодного прохода. Он застонал, сев с затуманенными от боли глазами. Он сразу же вспомнил предыдущую ночь. Было странно, что столько искателей приключений пришли в одну и ту же одинокую таверну за один вечер. Как могло случиться, что такой достойный волшебник, как он, оказался в компании простых бандитов? Никогда больше он не сможет смотреть в глаза своим коллегам-заклинателям.
Однако в данный момент его главной заботой было выбраться из грязной дыры, в которую он угодил по пьяни. Пока он шел, сердце Мурлока замирало. Казалось, что коридоры никогда не заканчивались, соединяясь друг с другом, как огромный лабиринт. Он начал задумываться, не судьба ли ему стать крысиным кормом в этом богом забытом месте. В этот момент он заметил, как что-то движется над его головой. И когда он завернул за угол, он был уверен, что увидел фигуру, вырисовывающуюся в темноте. Глаза его не обманули: это был один из авантюристов, которых он встретил в таверне накануне вечером.
Темное Сердце уже собирался подойти к нему, как вдруг почувствовал тошноту и упал на землю. Его голова, казалось, вот-вот взорвется, и он был сбит с толку странными видениями неизвестных ему вещей. Но боль исчезла. Дискомфорт утих, и на смену ему пришло успокаивающее присутствие. Когда он пришел в себя, Темное Сердце понял, что с ним произошло что-то очень странное, но он не испугался. С ним был Бладвич.
Как играть в Bloodwych
Ты – один из Кровавых. Вы должны взять на себя роль одного из шестнадцати чемпионов Тразерии. Сначала вы должны исследовать Трейхадвил, нанимая новых чемпионов и собирая предметы, которые помогут вам в выполнении задания. Как только вы будете готовы, вы должны взять четыре кристалла-аккумулятора из башен. Отведите их в пятую башню и там уничтожьте Зендика и изгоните Повелителя Энтропии в царство хаоса. Для этого вам придется победить агентов Зендика. Повелитель Энтропии превратил многих жителей Тразерии в странных монстров и испортил разум большинства из них, превратив их в убийц-психопатов. Некоторые из этих граждан будут помогать вам, но многие попытаются уничтожить вас. Удачи вам в ваших поисках и помните: дух Бладвича всегда будет с вами.
В BLOODWYCH играют с помощью клавиатуры или джойстика, который имитирует функции контроллера мыши вашего компьютера. Amstrad и Spectrum дают вам возможность определить функции клавиатуры; если вы хотите использовать джойстик, выберите эту опцию и нажмите на джойстик, когда появится запрос. Большинство функций BLOODWYCH активируются с помощью джойстика, путем перемещения индикатора (в виде маленькой стрелки) над пиктограммой и последующего нажатия кнопки fire для активации этой пиктограммы. Индикатор игрока 1 – синий, а игрока 2 – красный.
Персонажи
На странице выбора персонажа (см. рисунок 1) показаны шестнадцать доступных чемпионов. Чтобы осмотреть чемпиона, нажмите на щит, изображающий этого персонажа. После этого чемпион появится в одном из ящиков игрока в правой части экрана вместе со своими атрибутами, которые отображаются в окне персонажа.
Нажмите на значок сумки, чтобы просмотреть инвентарь персонажа. Значок сумки превратится в книгу. Нажмите на него, чтобы вернуться в окно персонажа. Перейдите в раздел “Заклинания и инвентарь” для объяснения этих экранов.
Если теперь вы хотите посмотреть другого чемпиона, вы можете сделать это, нажав на соответствующий щит. Таким образом, вы можете просмотреть столько чемпионов, сколько захотите. Когда вы выбрали подходящего чемпиона, нажмите на иконку Stick (игральные карты), чтобы подтвердить свой выбор. Когда оба игрока (в игре на двоих) выбрали своих чемпионов, игра начинается. Убедитесь, что вы выбрали чемпионов, которых хотите взять, так как вы не сможете найти их снова. Каждый игрок может выбрать до четырех чемпионов, чтобы сформировать команду.
Психологические типы
Существует четыре психологических типа, каждый из которых обозначается типом карты. Каждый психологический тип имеет свои сильные и слабые стороны. К ним относятся:
Бойцы, хороши в бою: Ромб.
Волшебники, превосходные заклинатели: клубы.
Авантюристы, завершители и выпускники: Сердца.
Лучники/ассасины: Бриллианты.
Рисунок 1: выбор чемпиона
Значки чемпионов
Избранный чемпион
Прокрутка персонажа
Окно значков
Палка чемпиона (тип)
Имя чемпиона
Любой психологический тип может пытаться и выполнять действия, обычно связанные с другим типом. Однако они могут плохо адаптироваться.
Качества характера
Если вы нажмете на значок свитка (рисунок 2), вы вызовете свиток выбранного вами персонажа. В нем проявляются следующие качества персонажа:
УРОВЕНЬ: Это показатель опыта персонажа. Это влияет на все основные и специальные навыки. Чем выше ваш уровень, тем лучше вы разбираетесь во всем.
СИЛА: Это влияет на то, насколько легко вы наносите удары во время боя и какой урон вы можете нанести своему противнику.
AGILITY: Это также влияет на ваши боевые способности, а также на вашу способность уклоняться от атак.
ИНТЕЛЛИГЕНЦИЯ: Это ограничивает количество очков заклинаний, которые у вас есть.
ХАРИЗМА: Это показатель того, насколько сильно вы влияете на других персонажей.
HIT POINTS: показывает, сколько урона вы можете получить перед смертью. Очки попадания могут быть восстановлены соответствующими зельями, заклинаниями или отдыхом. Первая цифра показывает ваши хит-пойнты на данный момент, а вторая – максимальное количество хит-пойнтов, которого вы можете достичь.
ВИТАЛИТИ: Это показатель того, сколько у вас энергии. Если ваша жизненная сила упадет до нуля, вы начнете получать урон. Для восстановления жизненных сил можно использовать зелья и заклинания. Как и в случае с хит-пойнтами, первая цифра показывает вашу текущую жизненную силу, а вторая – максимальную.
ПИТАНИЕ: Эта полоска показывает, насколько хорошо питается персонаж. Если полоска короткая, персонаж голоден и нуждается в пище как можно скорее. Уровень питания влияет на скорость восстановления жизненных сил.
Щелкните один раз где-нибудь на экране, чтобы вернуться на главный экран управления. Важные качества лидера в этот момент также отображаются в окне статистики справа от иконки лидера. Три полоски в этом поле показывают сверху вниз: очки хитов, жизненные силы и очки заклинаний.
Перемещение персонажей
Когда в BLOODWYCH вы перемещаетесь или выполняете важное действие, выбранный лидер группы является тем, кто выполняет это действие. Остальные члены группы отвечают по собственной инициативе. Текущий лидер обозначается рамкой вокруг его значка Stick (рисунок 2). Чтобы сменить лидера, просто дважды щелкните на соответствующем значке Stick. Обратите внимание, что лидер не обязательно должен находиться впереди группы.
В любой момент можно изменить порядок работы группы. Для этого просто щелкните один раз по новой позиции, и порядок выполнения изменится соответствующим образом.
Перемещение осуществляется путем нажатия на соответствующий значок перемещения (рисунок 2). Обратите внимание, что повороты влево или вправо заставляют вашего персонажа повернуться на 90° в точке, а шаг влево или шаг вправо заставляет вашего персонажа двигаться вправо или влево, не глядя в этом направлении.
Рисунок 2: Главный экран
Значок лидера
Панель уровня
Левый поворот
Шаг вперед
Правый поворот
Имя персонажа
Книжная икона
Значок прокрутки
Значок двери
Значок сумки
Значок палочки
Лидер момента
Групповые щиты
Перспективное видение в трех измерениях
Переход налево
Шаг назад
Переход вправо
Значок обороны
Значок удара
Когда значок движения активирован, он будет кратковременно мигать, и ваш персонаж будет двигаться соответствующим образом. Если вы попытаетесь переместиться в место, которое уже занято, например, колонной или другим персонажем, значок будет мигать, но перемещения не произойдет.
Лестницы
Чтобы подняться или спуститься по лестнице, просто наступите на нее. Для этого не обязательно стоять лицом к лестнице. Если вы включите лестницу, вы будете двигаться вверх или вниз, в зависимости от того, где вы находились – в начале или в конце.
Двери
Двери можно открыть или закрыть, нажав на значок “Дверь” (рисунок 2) или щелкнув по двери в трехмерном окне. Если вы ранее произнесли непрерывное заклинание или если есть заклинание, ожидающее произнесения, то значок двери будет скрыт значком заклинания. Чтобы использовать значок двери, необходимо сначала отменить заклинание. Если вы попытаетесь открыть запертую дверь, появится надпись “LOCKED”. Запертые двери можно открыть с помощью соответствующего ключа или заклинания. В разделах о заклинаниях и инвентаре объясняется, как это сделать.
Заклинания
Если вы нажмете на значок Книги, появится Книга заклинаний (рисунок 3). Если вы нажмете на стрелки над книгой, страницы будут перелистываться вперед или назад. Если вы нажмете на двойную центральную стрелку, книга закроется, и вы вернетесь на главный экран управления.
Подготовка заклинаний
Чтобы подготовить заклинание, нужно сначала нажать на одну из четырех “рун”, которые появляются на каждой странице. Можно выбрать только известные заклинания, которые окрашены в цвета их магического соответствия (зеленый, синий, красный или желтый). Неизвестное заклинание по-прежнему будет выделено серым цветом и не может быть выбрано. Выбранное заклинание обозначается в книге заклинаний его названием, цветом и стоимостью. Если заклинание не подготовлено, в области под книгой появятся серые звезды, и там не будет названия заклинания.
Рисунок 3: книга заклинаний
Переверните страницы вперед
Закройте книгу
Переверните страницы назад
Руны
Звездная икона
Значение FIREBALL
Снижение стоимости
Увеличивает стоимость
Значение выбранного заклинания можно изменить, нажав на стрелки рядом с его значением в данный момент. Если вы повысите ценность заклинания, его сила увеличится, как и процент его применения, но ваши очки заклинаний также уменьшатся. Если вы снизите значение заклинания, вы потратите меньше очков заклинаний, но его сила или процент применения уменьшатся. Под заклинанием отображаются ваши текущие очки заклинаний или максимальное количество очков заклинаний. Если заклинание успешно, оно повышает ваш навык владения этим заклинанием, делая его дешевле и/или мощнее при последующих применениях. Подготовленное заклинание может ждать до тех пор, пока оно не будет произнесено, или пока не будет выбрано другое заклинание, или пока партия не заснет.
Наложение заклинаний
Заклинание произносится нажатием на значки звезд, которые находятся по обе стороны от названия заклинания. Если книга заклинаний будет закрыта до того, как подготовленное заклинание будет произнесено, то значок двери будет заменен значком звезды, который также может быть использован для произнесения заклинания. Если у персонажа готово заклинание, когда он вступает в бой, то заклинание автоматически будет применено первым. Персонаж не может произнести заклинание, требующее больше очков, чем у него есть в наличии. Заклинание с низким процентом может оказаться неудачным, о чем будет сообщено соответствующим сообщением. После произнесения заклинания персонаж получает временный штраф на все заклинания, пока восстанавливает силы. Время восстановления увеличивается для заклинаний высокого уровня.
Эффект от заклинаний
Все заклинания имеют различные эффекты, которые являются комбинацией вашего мастерства как волшебника, энергии, которую вы тратите на заклинание, вашего опыта применения заклинания и удачи. Полоса процента заклинаний дает четкое представление о том, готовы ли вы успешно произнести заклинание. Когда ваша способность к произнесению заклинаний достигнет 100%, эффект заклинаний начнет усиливаться.
Непрерывные заклинания
Некоторые заклинания имеют непрерывный эффект. Когда они произносятся, значок, представляющий заклинание, заменяет значок врат. Заклинание можно отменить, нажав на этот значок. Никакие другие заклинания не могут быть применены, когда используется непрерывное заклинание. Если во время использования непрерывного заклинания из книги заклинаний будет произнесено другое заклинание, то оно отменит непрерывное заклинание. Во время действия непрерывного заклинания можно подготовить другое заклинание. Подготовленное заклинание можно произнести из книги заклинаний или отменив непрерывное заклинание, чтобы на главной панели появился значок звезды.
Специализация
Все персонажи специализируются на одном из цветов магии в соответствии с их выравниванием. На это указывает цвет значка посоха на щите. Заклинания естественного цвета легче произносить и они более действенны и эффективны, чем заклинания другого цвета. Каждый магический цвет представляет собой отдельную сферу влияния:
Зеленый (магия змеи): Представляет экстрасенсорику.
Голубой (лунная магия): представляет разум и иллюзии.
Красный (магия дракона): это использование огня и энергии.
Желтый (Магия хаоса): влияет на природу магии и жизни.
Приобретение заклинаний
Алмазы и бриллианты получают новое заклинание каждый второй уровень. Червы получают по одной за уровень, а трефы – по две за уровень. Новые заклинания изучаются во время сна, когда персонажа посещают феи заклинаний. Одна из фей заклинаний посетит персонажа во время сна и предложит заклинание, если персонаж заплатит за заклинание. Если вас не устраивает тот, который она предлагает, то откажитесь от него, и она, вероятно, предложит вам другой в следующий раз, когда персонаж будет спать. Если вы решите заплатить Фее заклинаний, то заклинание будет добавлено в вашу книгу, готовое к использованию.
Вот краткое описание 32 заклинаний:
Заклинания змеи (заклинания змеи)
Доспехи: Носите это заклинание с гордостью.
Паралич: Замороженная жизнь может быть очень короткой.
Компас: никогда больше не заблудитесь.
Левитация: Истинно легкое заклинание.
Боевая мощь: Вы можете иметь силу 10.
Renew (обновить): лечит все, кроме судорог.
Дуговой болт: электризующий опыт.
Formwall: Для тех, кто любит стены.
Лунные заклинания (заклинания луны)
Обманывать (обманываться): покрыть язык серебром.
Смущение: Они не будут знать, что их поразило.
Скрыть (утаить): Что нельзя увидеть, то нельзя украсть.
Ваниш: Теперь вы видите меня… теперь вы меня не видите.
Реальное зрение (truview): больше никогда не проигрывайте в прятки.
Иллюзия: достаточно реальна, чтобы причинить вред.
Mindrock: Для тех, кто думает, что любит стены.
Ведьмин ветер (wychwind): Просто заставьте их летать.
Заклинания дракона (заклинания дракона)
Ракета: один в глаз для лучников.
Магический замок (magelock): зачем возиться со всеми этими ключами.
Витализ: Вы никогда не чувствовали себя так хорошо.
Снять заклинание (развеять): то, что делает магия, магия отменяет.
Огненный шар: бомба для групп.
Перезарядка: заряжает силы колец.
Огненная дорожка: отдых на красном ковре.
Блейз: Никто не сможет перешагнуть через этот дикий взрыв.
Заклинания теней (заклинания теней)
Террор (ужас): Оооо!
Deflect: одно заклинание в день удерживает стрелы на расстоянии.
Алхимия: рука Мидаса.
Антимагия (antimage): больше никогда не беспокойтесь о пользователях магии. Spelltap: бич тех, кто использует магию.
Summon: Ты никогда не будешь ходить один.
Вивифицировать: заставляет смерть казаться неудобным мезоло
Разрушение: Известен некоторым как “смертельный удар”.
Инвентаризация и обработка объектов
Нажатие на значок инвентаризации (рисунок 2) вызывает экран инвентаризации (рисунок 4). В инвентаре каждого персонажа есть двенадцать распределителей иконок (десять на Spectrum). Первые четыре распределителя предназначены для предмета, удерживаемого в левой руке, предмета, удерживаемого в правой руке, надетых доспехов и щита.
Рисунок 4: Инвентаризация
Имя персонажа
Ручной распределитель
Дистрибьютор брони
Дистрибьютор щитов
Распределители рюкзаков
Персонаж
Значки в виде палочек с символами
Передача/Использование значка выхода распределителя
Индекс защиты
Классы “Клубы” и “Бубны” могут быть только маленькими щитами. Восемь оставшихся дистрибьюторов – это рюкзаки. Под этими распределителями находится рейтинг защиты, который персонаж имеет в настоящее время. Это показывает, насколько эффективно броня поглощает удары. Чем меньше число, тем эффективнее броня. Ниже расположены значки стиков группы. Инвентарь персонажа, отображаемый в любой момент времени, окружен рамкой. Последние два значка предназначены для дилера передачи/использования, а затем значок выхода. Если вы нажмете на последний значок, вы вернетесь на главный экран управления.
Выбор инвентаризации
Чтобы выбрать инвентарь персонажа, просто нажмите на соответствующую иконку Stick. Имя персонажа отобразится в верхней части экрана, а также появится его инвентарь.
Использование дистрибьютора для передачи
Если вы нажмете на любой объект в инвентаре, объект переместится в распределитель переноса, где им можно легко манипулировать. Аналогично, если вы нажмете на пустой инвентарный стеллаж, любой предмет, находящийся на стеллаже для переноса, переместится на пустой стеллаж. Распределители рук предназначены для чего угодно, но оружие, кольца, жезлы и посохи будут полезны только тогда, когда вы их сюда положите. Раздатчик брони предназначен для носимых предметов, раздатчик щита – для щитов, а раздатчики рюкзака – для чего угодно.
Чтобы обменять предмет в инвентаре на предмет в зоне переноса, просто нажмите кнопку инвентаря, и они обменяются.
Чтобы переместить объект в область переноса, просто щелкните по тому месту на 3D-экране, куда вы хотите его переместить. Аналогично, чтобы забрать объект, щелкните по нему, и он переместится к распределителю переноса. Если в распределителе передач уже что-то есть, объект будет сброшен.
Стрелки, обычные ключи и монеты
Эти объекты отображаются с цифрой, указывающей на их количество. Если вы щелкните один раз, вы переместите объект в зону переноса. Если вы затем нажмете большее количество раз на распределитель переноса, вы переместитесь больше.
Перемещение объектов между персонажами
Чтобы передать предметы от одного персонажа к другому, переместите предмет в распределитель передачи, затем выберите персонажа, который должен получить предмет, и переместите предмет в пустой распределитель в его инвентаре.
Использование объекта
Чтобы использовать предмет, например, еду, питье или зелья, поместите его в автомат переноса, а затем нажмите на него. Они будут потребляться персонажем, чей инвентарь вы сейчас просматриваете. Когда предмет для еды или питья находится в раздаточном автомате, уровень еды этого персонажа отображается в окне сообщений, которое находится под трехмерным окном, для удобства.
Мечи и другое оружие должны носиться персонажем в ручном автомате, если они будут использоваться. Это также относится к посохам, жезлам и кольцам. Предмет может находиться в любой из двух рук-дозаторов, но если в обеих руках есть оружие для боя, то будет использоваться то, которое находится в левой руке. Если персонаж хочет использовать лук в бою, и лук, и стрелы будут находиться в ручных раздатчиках.
Разграбление мертвых персонажей
Если член партии находится с партией в момент смерти, то доступ к его инвентарю все еще возможен. Если член партии в момент смерти находился вне партии, то тело должно быть восстановлено, прежде чем можно будет получить доступ к инвентарю. Вы не можете получить доступ к инвентарю мертвых персонажей, которые не являются членами вашей партии.
Бой
Бой происходит, когда ваша группа сталкивается с враждебными существами или когда группа инициирует атаку на существо. Бойцы могут предпринять шесть инициатив действий:
1. НЕ ДЕЛАЙТЕ НИЧЕГО (это не рекомендуется).
2. РЕТРИТ: быстрое перемещение за пределы досягаемости противника.
3. АТАКА: нажав на иконку “Удар”.
4. ЗАЩИТА: Щелкнув по значку “Защита” (это полезно, если вам нужно выполнить какое-либо действие, например, перестроить походный порядок).
5. Сотворите заклинание (см. раздел “Заклинания”).
6. ВЫСТРЕЛИТЬ ИЗ МИССИЛИ: нажав на значок “Удар”, держа в руках лук и стрелы.
Во время боя персонажи будут следовать вашим боевым инструкциям и в целом действовать по собственной инициативе. В этом случае вы контролируете только инвентарь и книги заклинаний персонажей вашей партии. Лидер партии не будет участвовать в атаке, пока вы изучаете инвентарь или выбираете заклинание. Во время боя можно менять командира отряда и походный порядок, а также всегда можно попытаться сбежать. Партия будет продолжать сражаться до тех пор, пока все ваши персонажи не погибнут, а враги не умрут или не обратятся в бегство. Во время боя ракетное оружие могут запускать только персонажи, занимающие две задние позиции на марше. Удары могут наносить только персонажи, занимающие две фронтальные маршевые позиции. Заклинания можно произносить из любого положения.
Отображение боевой обстановки
Каждый раз, когда партия получает урон, нанесенный урон отображается на мигающем значке щита персонажа. Экран ситуации превратится в серию вертикальных полос, показывающих уровень урона каждого члена партии. Этот экран также можно просмотреть в любое время во время игры, нажав на изображение лидера группы. Ущерб, нанесенный группой, отображается в двух окнах сообщений с небольшим значком Stick для облегчения идентификации. Ущерб, нанесенный лидером группы, отображается в небольшом окне сообщений трехмерного дисплея.
Общение с другими персонажами
Если вы нажмете на панель ситуаций, вы поприветствуете любого персонажа, находящегося прямо перед вами. Варианты:
ПРЕДЛОЖЕНИЕ: Предложите дилеру по передаче предмет, который вы хотите обменять или продать. Это также используется для предложения золота во время покупки. Команда может быть использована более одного раза во время транзакции. Например, если монстр отказывается от предложенного вами золота, вы можете предложить ему больше или меньше. Это также работает с товарами, за которые вы можете предложить другой товар. Если вы не покупаете, не продаете и не обмениваете что-либо, то предлагаемые предметы преподносятся в качестве подарка.
ПОКУПКА: Спросите, есть ли у монстра или персонажа что-то на продажу.
EXCHANGE: используется для определения того, какие предметы несет монстр или персонаж, и хотят ли они торговать.
ПРОДАВАТЬ: Предлагать товар на продажу в вашем трансферном центре.
ДА и НЕТ: Эти значки используются для ответов на вопросы.
Различные команды
Доступ к ним осуществляется одновременно с меню связи путем нажатия на панель состояния.
Выход
Значок выхода используется для выхода из меню связи, в котором вы находитесь.
Операции с дисками
Если значок диска нажат обоими игроками (в игре для двух игроков), текущая игра может быть сохранена или восстановлена старая игра.
Пауза
Если вы нажмете на значок паузы, игра будет приостановлена для обоих игроков до тех пор, пока значок паузы не будет нажат снова.
Мечта
Если вы нажмете на значок сна, вы переведете партию в спящий режим. Это ускоряет восстановление хит-пойнтов, очков жизненной силы и очков заклинаний. Сон можно улучшить, если встать лицом к кровати, нажав на иконку. Сон очень важен. Персонажи получают уровни опыта только во время сна, а также новые заклинания. Как правило, после битвы полезно поспать.
Советы и предложения
В самом начале
Когда вы впервые играете в BLOODWYCH, уделите время тому, чтобы поэкспериментировать с управлением игрой. Попробуйте использовать различные значки и меню и обратите внимание на различные эффекты, которые дают заклинания. Если вы потратите некоторое время на знакомство с более продвинутыми возможностями BLOODWYCH, вам будет легче прогрессировать, когда вы будете играть по-настоящему.
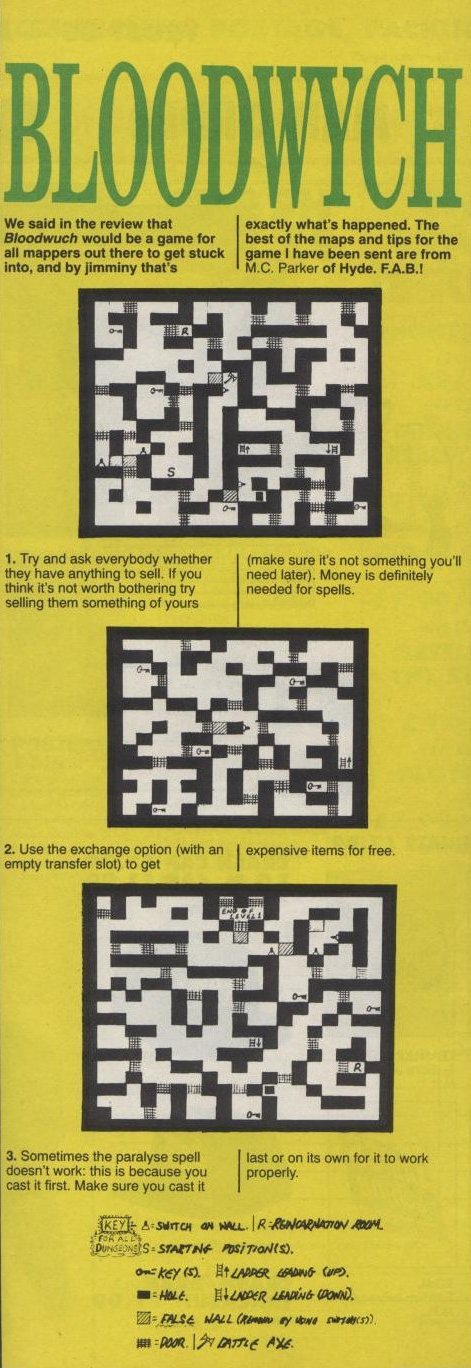
Всегда имейте при себе карту. Без него вы, скорее всего, заблудитесь. Укажите на нем двери и комнаты. Если вы оставляете за собой предмет или персонажа, отметьте его местоположение на карте. Неплохо также отметить расположение ям и ловушек, через которые вы проходите, чтобы избежать их в будущем.
Бой
Всегда следите за хит-пойнтами членов вашей партии и будьте готовы переместить кого-то позади партии или убежать, чтобы восстановиться. Как правило, хорошей идеей является то, чтобы главный заклинатель был лидером группы во время боя и находился в задней части группы. Таким образом, он или она сможет произнести несколько подготовленных заклинаний до начала боя, потому что первым действием ваших персонажей будет произнесение всех подготовленных заклинаний.
Магия
Старайтесь, чтобы в вашей вечеринке был хороший цветовой баланс. Поскольку персонаж будет лучше произносить заклинания своего цвета, пусть более слабые заклинатели (например, Ромб или Алмаз) сначала выучат заклинания своего цвета. Особо полезные заклинания должны изучать все. Не бойтесь использовать магию, вы можете стать только лучше.
Управление группой
Похвала и исправление напрямую влияют на поведение члена партии во время боя. Если у вас есть особая роль для персонажа, убедитесь, что ваша похвала или исправление уместны до того, как он вступит в бой, поскольку во время боя сделать то же самое невозможно.
Психологические типы характеров
Ромбы – это воины БЛУДВИЧА. Они могут использовать любое оружие, броню или щит. У них обычно больше хит-пойнтов и силы, чем у других персонажей, но они не очень хорошо владеют магией.
Трилистники – это маги БЛУДВИЧА. Хотя на низких уровнях они слабы, но по мере изучения заклинаний и приобретения опыта быстро становятся сильными. На высоких уровнях Шамроки являются грозными противниками.
Червы компетентны во всех дисциплинах. Это универсальные люди. Они также обладают гораздо более приятными личностными качествами, чем представители других психологических типов, что делает их лучшими бизнесменами.
Навыки Даймонда лежат в области скрытности, стрельбы из лука и наблюдения. Если они нападут на врага сзади, то нанесут большой урон, учитывая, что они используют оружие, хорошо подходящее для ассасина. Если Алмаз является лидером вашей группы, вы, как правило, заметите то, что в противном случае осталось бы незамеченным.
Общий
Не спешите выбрасывать ненужный предмет, ведь большинство вещей можно продать или обменять.
В палатах имеются комнаты регенерации. Эти волшебные места вернут к жизни умершего персонажа. Постарайтесь быстро найти их и запомнить, где они находятся.
Не спешите убивать вещи – это нелегко, если это знакомый вам монстр!
Когда вы занимаетесь торговлей, вам будет необходимо держать свои запасы в поле зрения.
Постарайтесь не быть слишком жадными в игре для двух игроков. Если вы часто о чем-то спорите, постарайтесь решить этот вопрос, пока вы не убили друг друга!
BLOODWYCH – это длинное и сложное приключение. Почти наверняка вы не сможете завершить его за один сеанс. Вы можете легко сохранить свою позицию в игре, нажав на значок диска. При следующей загрузке BLOODWYCH вы можете вернуться к сохраненной позиции и продолжить игру с этой точки. Вам также будет полезно сохранять игру через регулярные промежутки времени во время игры. Таким образом, вас не постигнет никакая беда, например, отключение электричества, которое уничтожит всю вашу вечеринку!
© 1989 MIRRORSOFT LTD.
Карта Bloodwych
Карта Bloodwych
Карта Bloodwych
Карта Bloodwych
Карта Bloodwych
Карта Bloodwych
Карта Bloodwych
Карта Bloodwych
Карта Bloodwych
Карта Bloodwych
Карта Bloodwych
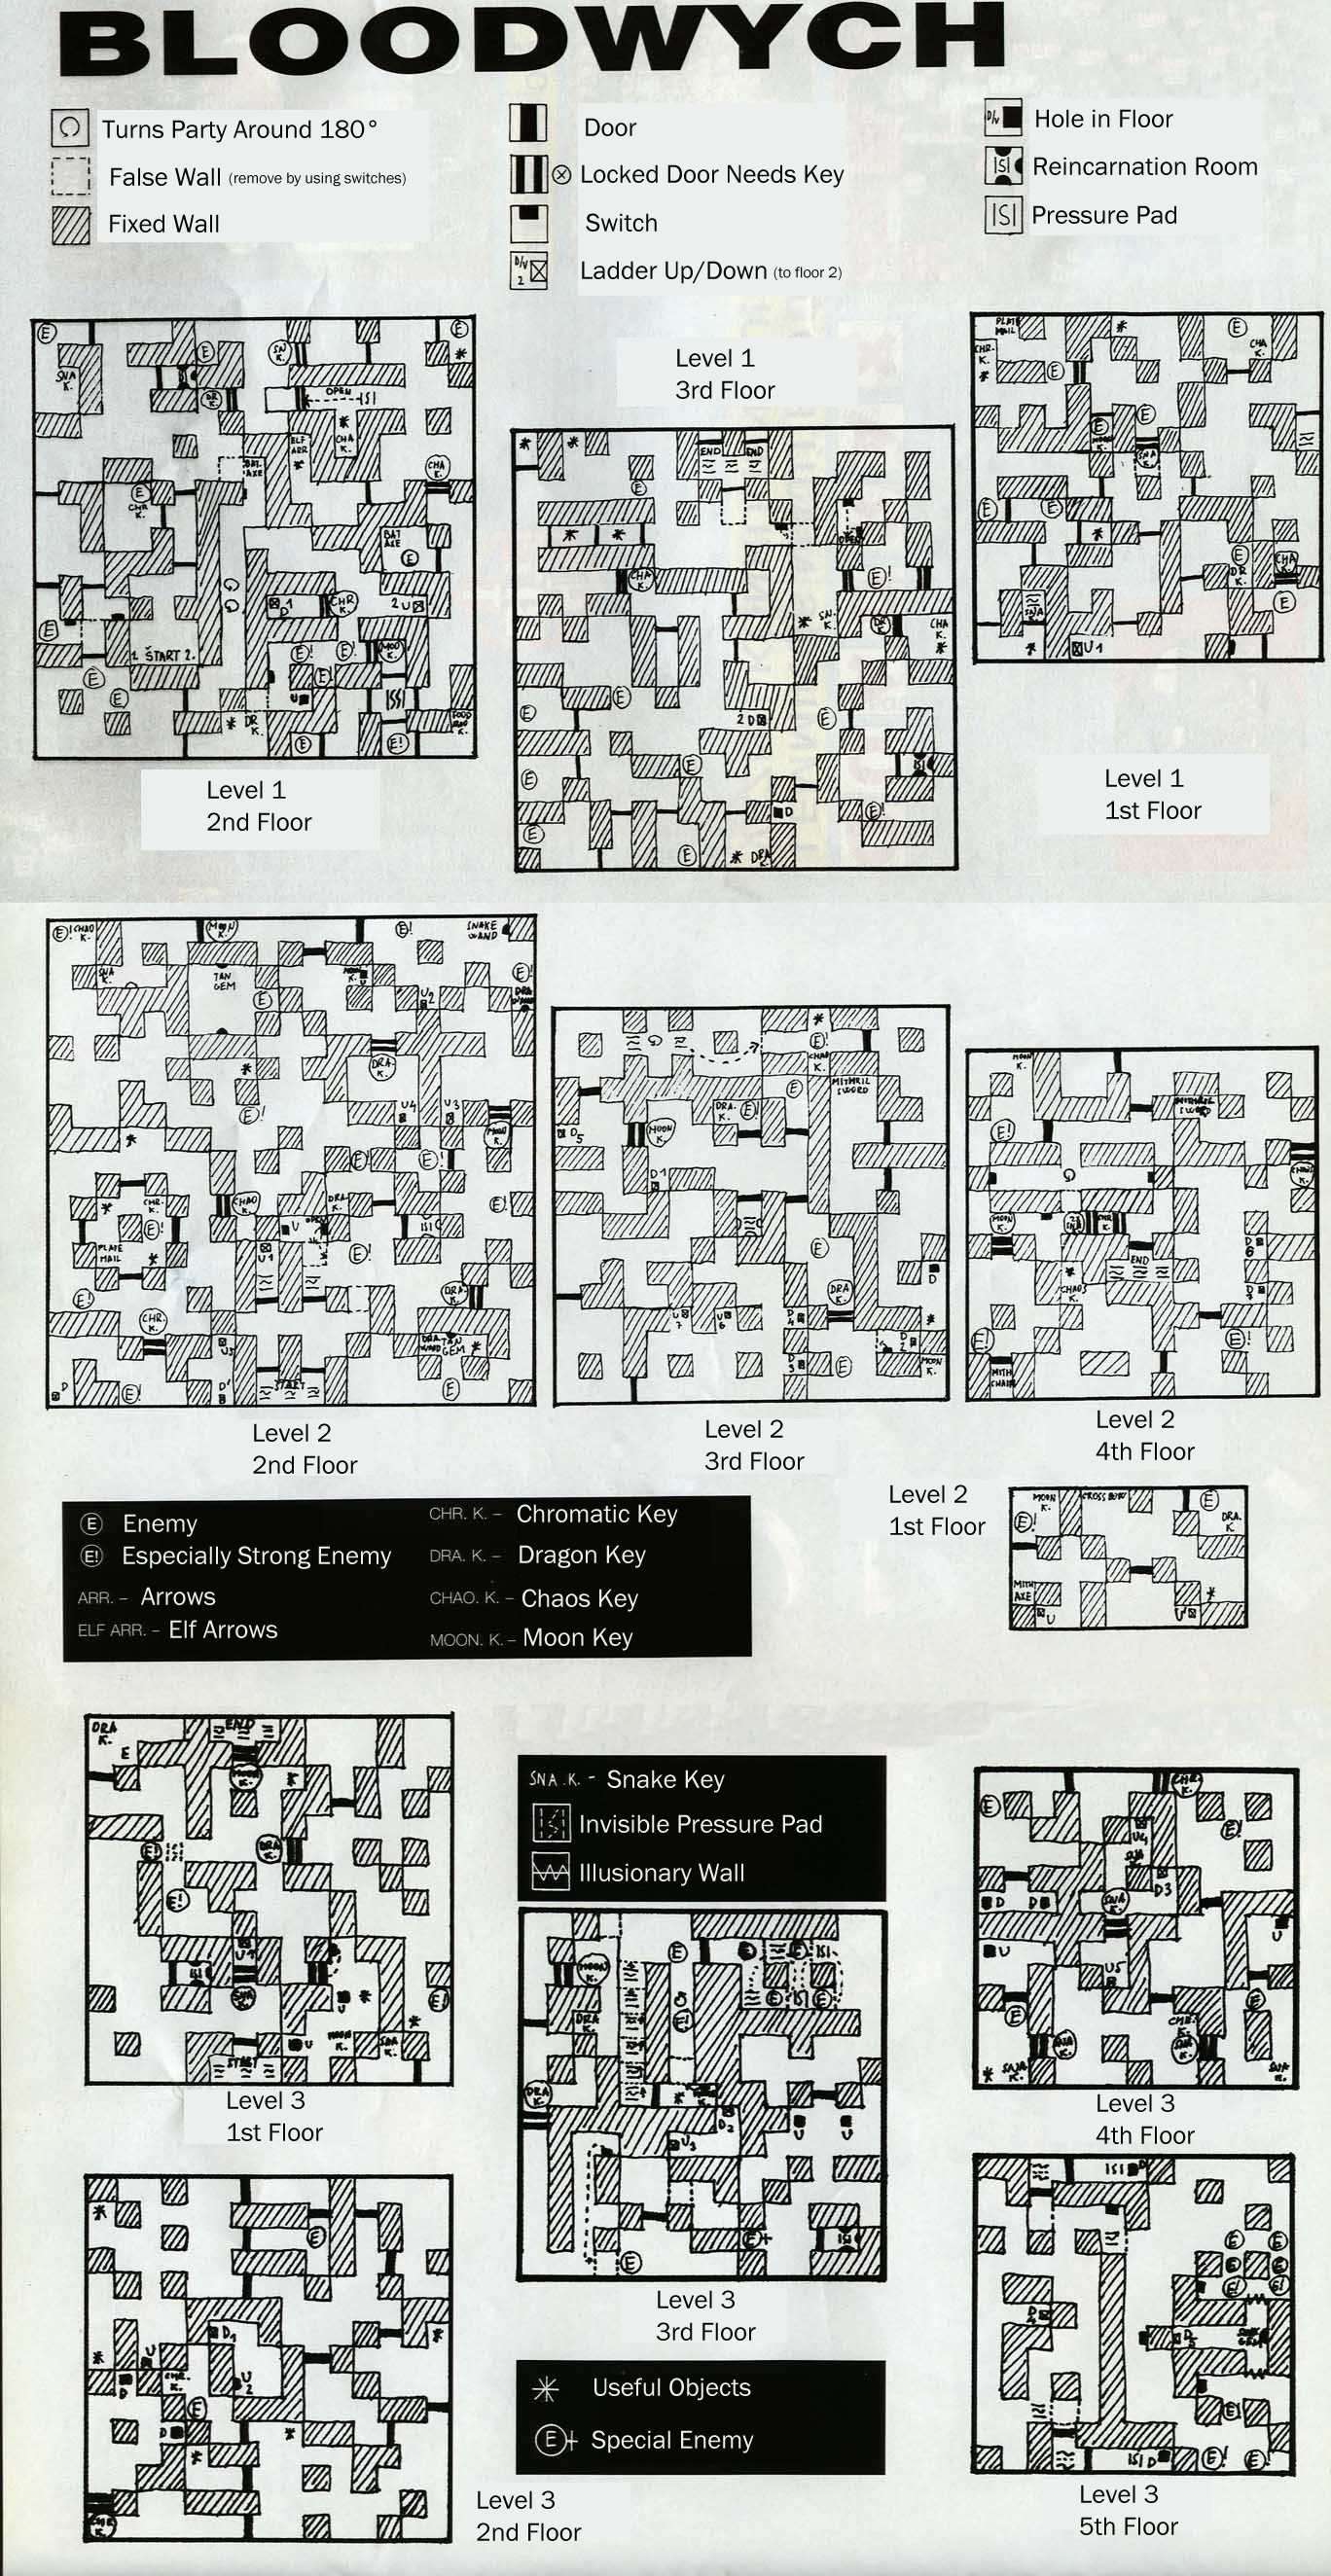
Карта Bloodwych
Карта Bloodwych
Игра Bloodwych запускается прямо на сайте. Ролевая игра, опубликованная в Великобритании в 1990 году творческой группой Image Works, которую разработали Philip Taglione, Pete James и Anthony Taglione.
A challenging adventure game. Explore Treihadville, hire champions, and collect items. Your task is to retrieve four crystal accumulators from the towers, defeat the Zendica agents, and put an end to the Entropy Master. You’ll encounter complex character interaction systems, spells and battles, as well as a straightforward badge system. Be careful with the residents, as many of them have turned into monsters. Good luck on your journey!
Bloodwych
Spectrum, amstrad, commodore
Instructions
BLOODWYCH is a sophisticated adventure game that uses all the most advanced features of your computer. BLOODWYCH has taken a lot of time and effort. A unique experience in computer adventure games that comprises:
* An advanced character interaction system that allows you to fully communicate with the other creatures and people in the game.
* Sophisticated spell casting and combat systems that enhance the reality of the game.
* An easy to use icon system.
* Three-dimensional vision.
* And much more…
This booklet contains full information and instructions on how to play BLOODWYCH, allowing you to quickly get started and enjoy the game. At the end of the booklet you will find some tips on how to get the most out of BLOODWYCH. These will help you get into the more advanced aspects of the game with ease. Now turn to the next page, because your adventure begins…
Loading instructions
Commodore C64 (128 in 64 mode)
Disk: Type LOAD “*”,8,1 and press RETURN.
Tape: To load, press SHIFT + RUN STOP keys at the same time.
Amstrad CPC
Disk: To load, type RUN “DISC.
Tape: To load, type 1 TAPE (on disk-based computers). Press CONTROL + ENTER keys at the same time.
Spectrum
Disc + tape (128 K). Select the LOADER option from the title menu. The game will run automatically.
48 K: To load, type LOAD”” and press ENTER.
The legend of bloodwych
It has long been the custom among the people of Trazere to recount the oldest legends. Such as that of Bloodwych, the secret order of the Psychic Mages. It is told that many eons ago the order of Bloodwych reigned over the ancient and mighty city of Treihadwyl. There they secretly directed the affairs of the land of Trazere, punishing and rewarding its citizens and communicating with the elements on their behalf. For many centuries, the people of Trazere lived in respect for Bloodwych, for as long as they ruled the land was safe. Safe, that is, until a black dawn long before your grandfather’s great-great-grandfather was conceived.
Then there was among the Bloodwych a Zendick, second only to the Great Dragon in power and mystic arts. But for all his power and wisdom, Zendick was a creature driven by ambition and greed. He was not satisfied living in the shadow of the master of wizards, so he rejected the laws of Bloodwych and turned to the black and evil arts. After many years of diabolical plotting, Zendick was finally ready to strike the blow he had long dreamed of and that day he summoned the forces of darkness and destroyed the Great Dragon, leader of Bloodwych.
Their Bloodwych brethren were unprepared for this violent attack and so were unable to resist Zendick, who banished them forever to the astral plane. It is said that Zendick’s evil laughter could be heard echoing throughout the land that dawn. All day and night his laughter was heard and the next day the skies darkened and blood rained down and the earth opened up and many were the good citizens of Trazere never to be heard from again.
It is told, then, that during the moons that followed, Zendick called many creatures of the night to Treihadwyl, and the good people there dared not come out after the sun went down. And slowly the city of wizards was transformed. The creatures appeared on its walls and its forbidden towers and dropped large crystals inside them that slowly absorbed the energy and life forms of the Earth. With this energy, Zendick attempted to summon the Lord of Entropy, the embodiment of pure chaos, who would dissolve the universe into the elements from which it was formed. Zendick alone would then be able to recreate the world in his own image. Chaos would leave nothing but the crystals from which it was born.
With each passing year, the land of Treihadwyl grew more desolate and colder. The city itself seemed to radiate evil, infecting all who abandoned themselves to its influence. Trazere and its people were but a shadow of all they had once been, and the birth of each child and the harvesting of crops became occasions for mourning rather than rejoicing. Once a large crowd, armed with little more than their determination, marched into the city with the intention of putting an end to the plague that had ruined their lives. Only the men returned, half-starved and with their flesh burnt and naked. They barely had time to name the horrors they had seen before their last breath escaped their bodies and their souls joined those of their dead comrades.
Now, as I write this horror story, I find no more reason to live. Disease and despair have permeated the land and the pleasure in life that our fathers had will never be enjoyed by their children. All that is left is to pray. Pray that one day Bloodwych will return and avenge us.
Helveth Sharpquill, Scribe. Written by his own hand on this thirteenth day of Seth, in the year four thousand and eighty-one of darkness.
… Somewhere, deep in the realm of souls, a mind loomed beckoning its companions to it. Unnoticed, like the wind, the spirits of many gathered. Though formless, the minds were chained together, sharing their thoughts with each other. Not a word was spoken, not a sound, but within the astral void a thought took form.
“We are Bloodwych, immortal wizards in search of the light. Brothers, we must not be defeated. Zendick’s dark magic has grown too great. It must be destroyed, and the time is now. Zendick’s influence is now too strong. The Lord of Entropy is accumulating his power and very soon the plague of his destruction will begin. If we do not return him to the realm of chaos, all will be lost…”
“Saldar and Vestryl, you are charged with the most important task Bloodwych has ever had. You must find the last sixteen champions of Trazere and unite your minds with the two bravest. Then, to save the universe, you must lead them to the heart of Treihadwyl and once there find and destroy the accumulator crystals. Go now and the spirit of Bloodwych will be with you…”.
Murlock Darkheart awoke in the gloom of a cold passageway. He groaned as he sat up with his eyes misty with pain. He immediately remembered the night before. It was strange that so many adventurers had come to the same lonely tavern in a single evening. That, he promised himself, would be the last time a drop of mead would pass his lips. How was it possible that a worthy wizard such as he had ended up on a spree with common thugs? Never again would he be able to look his fellow spellcasters in the eye.
At the moment, though, his main concern was to get out of the filthy hole he had fallen into in his drunkenness. As he walked, Murlock’s heart began to sink. It seemed that the corridors never ended, linking into each other like a huge labyrinth. He began to wonder if it was his destiny to become rat fodder in this godforsaken place. At that moment he caught a glimpse of something moving above his head. And as he rounded a corner, he was certain that he had seen a figure looming in the darkness. His eyes did not deceive him, it was one of the adventurers he had met in the tavern the night before.
Darkheart was about to reach him, when he had a sudden nausea and fell to the ground. His head seemed about to explode and he was confused by strange visions of things unknown to him. But the pain disappeared. The discomfort subsided and was replaced by a comforting presence. When he recovered, Darkheart realised that something very strange had happened to him, but he wasn’t afraid…. Bloodwych was with him.
How to play bloodwych
You are one of the Bloodwych. You must take on the role of one of the sixteen champions of Trazere. First you must explore Treihadwyl, recruiting more champions and collecting items to aid you in your task. Once you are ready, you must take the four accumulator crystals from the towers. Take them to the fifth tower and there destroy Zendick and banish the Lord of Entropy to the realm of chaos. To do this you will have to defeat Zendick’s agents. The Lord of Entropy has transformed many of Trazere’s citizens into strange monsters and has corrupted the minds of most of them, turning them into psychopathic killers. Some of these citizens will help you, but many will try to destroy you. Good luck in your quest and remember: the spirit of Bloodwych will always be with you.
BLOODWYCH is played using the keyboard or joystick, which mimics the functions of your computer’s mouse controller. The Amstrad and Spectrum give you the opportunity to define keyboard functions; if you want to use the joystick, select this option and push your joystick when prompted. Most BLOODWYCH functions are activated using the joystick, by moving an indicator (in the form of a small arrow) over the icon and then pressing the fire button to activate that icon. Player 1’s indicator is blue and Player 2’s is red.
The characters
The character selection page (see figure 1) shows the sixteen available champions. To inspect a champion, click on the Shield representing that character. The champion will then appear in one of the Player Boxes on the right of the screen, along with its attributes, which are displayed in the Character Window.
Click on the Bag icon to view the character’s inventory. The Bag icon will now turn into a book. Click on it to return to the Character Window. Go to the Spells and Inventory section for an explanation of these screens.
If you now want to see another champion, you can do so by clicking on the appropriate Shield. You can view as many champions as you like in this way. When you have chosen a suitable champion, click on the Stick icon (the playing cards) to confirm your choice. When both players (in a two-player game) have selected their champions, the game will begin. Make sure you select the champions you want to take, as you will not find them again. Each player can select up to four champions to form a team.
Psychological types
There are four psychological types, each indicated by a type of card. Each psychological type has different strengths and weaknesses. The types are:
Fighters, good in combat: Rhombus.
Wizards, excellent spell casters: Clubs.
Adventurers, completists and graduates: Hearts.
Archers/assassins: Diamonds.
Figure 1: selecting the champion
Champion icons
Selected champion
Character scroll
Icons window
Champion’s stick (type)
Champion’s name
Any psychological type can attempt and perform actions normally associated with another type. However, they may not adapt well.
Character qualities
If you click on the Scroll icon (figure 2), you will bring up the scroll of the character you have selected. It shows the following qualities of the character:
LEVEL: This is an indication of the character’s experience. It affects all basic and special skills. The higher your level, the more proficient you are at everything.
STRENGTH: This affects how easily you strike during a fight and how much damage you can do to your opponent.
AGILITY: This also affects your combat ability, as well as your ability to dodge attacks.
INTELLIGENCE: This limits the number of spell points you have.
CHARISMA: This is an indication of how much influence you have over other characters.
HIT POINTS: This shows you how much damage you can take before you die. Hit points can be restored with the appropriate potions, spells, or by resting. The first figure shows your hit points at the moment, while the second figure shows the maximum number of hit points you can reach.
VITALITY: This is an indication of how much energy you have. If your vitality drops to zero, you will begin to take damage. Potions and spells can be used to help you recover your vitality. As with hit points, the first figure shows your current vitality, while the second shows your maximum vitality.
FOOD: This bar shows you how well fed a character is. If the bar is short, the character is hungry and needs food as soon as possible. The level of food influences the speed of regaining vitality.
Click once somewhere on the screen to return to the main control screen. The important qualities of the leader at that moment are also displayed in the stat box to the right of the leader’s icon. The three bars in this box show, from top to bottom: hit points, vitality and spell points.
Moving the characters
When in BLOODWYCH you move or perform an important action, the selected leader of the group is the one who performs the action. The other members of the group respond on their own initiative. The current leader is indicated by a box around their Stick icon (figure 2). To change the leader, simply double-click on the appropriate Stick icon. Note that the leader does not necessarily have to be at the front of the group.
At any time it is possible to change the running order of the group. To do this, simply click once on the new position and the running order will change appropriately.
Movement is achieved by clicking on the appropriate movement icon (figure 2). Note that left or right turns make your character turn 90° at the point, while a step left or step right makes your character move to the right or left without looking in that direction.
Figure 2: The main screen
Leader icon
Level panel
Left turn
Step forward
Right turn
Character name
Book icon
Scroll icon
Door icon
Bag icon
Stick icon
Leader of the moment
Group shields
Perspective vision in three dimensions
Passage to the left
Step backwards
Passage to the right
Defence icon
Strike icon
When a movement icon is activated, it will flash briefly and your character will move as appropriate. If you try to move to a place that is already occupied, by a pillar or another character for example, the icon will flash, but movement will not occur.
Stairs
To ascend or descend stairs, simply step on them. It is not necessary to face the stairs to do this. If you turn on a ladder, you will move up or down, depending on whether you were at the beginning or the end.
Doors
Doors can be opened or closed by clicking on the Door icon (figure 2) or by clicking on the door in the three-dimensional window. If you have previously cast a continuous spell or if there is a spell waiting to be cast, then the Door icon will be hidden by the spell icon. To use the Door icon it is necessary to cancel the spell first. If you try to open a locked door, the word “LOCKED” will appear. Locked doors can be opened with the appropriate key or spell. The spell and inventory sections explain how to do this.
Spells
If you click on the Book icon, the Book of Spells appears (figure 3). If you click on the arrows above the book, the pages will turn forwards or backwards. If you click on the double central arrow, the book will close and you will return to the main control screen.
Preparing spells
To prepare a spell, you must first click on one of the four “runes” that appear on each page. Only known spells can be selected, and these are coloured after their magical alignments (green, blue, red or yellow). An unknown spell will still be greyed out and cannot be selected. The selected spell is identified under the spellbook by its name, colour and what it is worth. If no spell is prepared, the area below the spellbook will have grey stars and there will be no spell name there.
Figure 3: the spell book
Turn the pages forwards
Close the book
Turn pages backwards
Runes
Star Icon
FIREBALL Value
Lower the value
Increases the value
The value of the selected spell can be altered by clicking on the arrows next to the value at that moment. If you raise the value of a spell, its power will increase, as well as its casting percentage, but your spell points will also decrease. If you lower a spell’s value, you will use fewer spell points, but its power or casting percentage will decrease. Your current spell points or maximum spell points are displayed under the spell. If the spell is successful, it will increase your skill with that spell, making it cheaper and/or more powerful in future casts. A spell that has been prepared can wait as long as it is cast or another spell is selected or the party sleeps.
Casting spells
A spell is cast by clicking on the Star icons, which are on either side of the spell’s name. If the spellbook is closed before a prepared spell is cast, then the Gate icon will be replaced by a Star icon, which can also be used to cast the spell. If the character has a spell ready when entering combat, then the spell will automatically be cast first. A character cannot cast a spell that requires more points than he or she has available. A spell with a low percentage may fail, and this will be indicated by the appropriate message. After casting the spell, the character will suffer a temporary penalty on all spells while recovering from the casting effort. This recovery time is longer for high level spells.
Effect of spells
All spells have varying effects, which are a combination of your skill as a wizard, the energy you spend on a spell, your experience with the spell cast and luck. The spell percentage bar gives a clear indication of whether you are ready to cast a spell successfully. Once your spell casting ability reaches 100% the spell effect starts to get stronger.
Continuous spells
Some spells have a continuous effect. When they are cast, an icon representing the spell replaces the Gate icon. The spell can be cancelled by clicking on this icon. No other spells can be cast when a continuous spell is in use. If another spell is cast from the spellbook when a continuous spell is in use, then it will cancel the continuous spell. You can have another spell prepared while the continuous spell is running. The prepared spell can be cast from the spellbook or by cancelling the continuous spell to reveal the Star icon in the main panel.
Specialisation
All characters specialise in one of the colours of magic according to their alignment. This is indicated by the colour of the Staff icon on a Shield. Spells of natural colour are easier to cast and more efficient and effective than spells of another colour. Each magical colour represents a different sphere of influence:
Green (Snake Magic): Represents the psychic.
Blue (Moon Magic): Represents the mind and illusion.
Red (Dragon Magic): It is the use of fire and energy.
Yellow (Chaos Magic): Affects the nature of magic and life.
Acquisition of spells
Diamonds and diamonds receive a new spell every second level. Hearts receive one per level and clubs receive two per level. New spells are learned during sleep, when the character is visited by the Spell Fairies. One of the Spell Fairies will visit the character during sleep and offer a spell, provided the character pays for the spell. If you are not happy with the one she offers, then reject it and she will probably offer you a different one the next time the character is sleeping. If you choose to pay the Spell Fairy, then the spell will be added to your book, ready to use.
Here is a brief description of the 32 spells:
Snake spells (serpent spells)
Armour: Wear this spell with pride.
Paralyze: A frozen life can be very short.
Compass: Never get lost again.
Levitate: A genuinely light spell.
Warpower: You can have the strength of 10.
Renew (renew): Cures everything except cramps.
Arc bolt: An electrifying experience.
Formwall: For those who love walls.
Moon spells (moon spells)
Deceive (beguile): Coat the tongue with silver.
Confuse: They will not know what has hit them.
Conceal (conceal): What cannot be seen, cannot be stolen.
Vanish: Now you see me… now you don’t see me.
Real vision (truview): Never lose at hide and seek again.
Illusion: Real enough to do harm.
Mindrock: For those who think they love walls.
Witchwind (wychwind): Just make them fly.
Dragon spells (dragon spells)
Missile: One in the eye for archers.
Magic lock (magelock): Why bother with all those keys.
Vitalise: You’ve never felt so good.
Remove spell (dispell): What magic does, magic undoes.
Fireball: A bomb for groups.
Recharge: Charge the powers of the rings.
Firepath: Rest on a red carpet.
Blaze: No one can cross that wild blast.
Shadow spells (shadow spells)
Terror (terror): Ooooh!
Deflect: One spell per day keeps arrows in the distance.
Alchemy: The hand of Midas.
Antimagic (antimage): Never worry about magic users again. Spelltap: The bane of those who use magic.
Summon: You will never walk alone.
Vivify: Makes death seem like an inconvenient mesolo
Disrupt: Known to some as “deathblow”.
Inventory and handling of objects
Clicking on the Inventory icon (figure 2) brings up the inventory screen (figure 4). Each character’s inventory shows twelve icon distributors (ten on Spectrum). The first four distributors are for an item held in the left hand, an item held in the right hand, the armour worn and the shield.
Figure 4: The inventory
Character name
Hand Distributor
Armour distributor
Shield Distributor
Backpack distributors
Character
Character stick icons
Transfer/Use Distributor Output icon
Protection index
The Clubs and Diamonds classes can only be small shields. The eight remaining distributors are backpacks. Underneath these distributors is the protection rating the character currently has. This indicates how effectively the armour is absorbing blows. The lower the number, the more effective the armour is. Below this are the group’s Stick icons. The character’s inventory shown at any given time is surrounded by a box. The final two icons are for the transfer/use dealer and then the Exit icon. If you click on the latter icon, you will return to the main control screen.
Selecting an inventory
To select a character’s inventory, simply click on the appropriate Stick icon. The character’s name will be displayed at the top of the screen and their inventory will appear.
Using the distributor to transfer
If you click on any object in the inventory, the object will move to the transfer distributor, where it can be easily manipulated. Likewise, if you click on an empty inventory rack, any item that is in the transfer rack will move to the empty rack. The hand distributors are for anything, but weapons, rings, wands and staffs are only useful when you put them here. The armour dispenser is for items you carry, the shield dispenser is for shields, and the backpack dispensers are for anything.
To exchange an item in the inventory for an item in the transfer zone, simply press the inventory button and they will be exchanged.
To drop an object in the transfer area, simply click on the place on the 3D screen where you want to drop it. Similarly, to pick up an object, click on the object and it will move to the transfer distributor. If there is already something in the transfer distributor, the object will be dropped.
Arrows, common keys and coins
These objects are shown with a number indicating how many there are. If you click once, you will move the object to the transfer zone. If you then click more times on the transfer distributor, you will move more.
Moving objects between characters
To transfer items from one character to another, move the item to the transfer distributor and then select the character that is to receive it and move the item to an empty distributor in their inventory.
Using an object
To use an item, such as food, drink or potions, place the item in the transfer dispenser and then click on it. They will be consumed by the character whose inventory you are currently viewing. When an eating or drinking item is in the transfer dispenser, that character’s food level is displayed in the message window, which is below the three-dimensional window, for easy reference.
Swords and other weaponry should be carried by the character in a hand dispenser, if they are to be used. This also applies to staffs, wands and rings. An item can be in either of the two hand-dispensers, but if both hands have weapons to fight with, the one in the left hand will be used. If a character wants to use a bow in combat, both the bow and the arrows will be in the hand dispensers.
Ransacking the dead characters
If a party member is with the party at the time of his death, then his inventory can still be accessed. If the party member was away from the party at the time of death, then the body must be recovered before the inventory can be accessed. You cannot access the inventories of dead characters who are not members of your party.
Combat
Combat occurs when your group encounters hostile creatures or when the group initiates an attack on a creature. Combat can take six action initiatives:
1. DO NOT DO ANYTHING (this is not recommended).
2. RETREAT: Moving quickly out of your opponent’s range.
3. ATTACK: By clicking on the Strike icon.
4. DEFEND: By clicking on the Defence icon (this is useful if you need to perform an action such as rearranging the marching order).
5. CAST A SPELL (see spells section).
6. SHOOT A MISSILE: By clicking on the Hit icon while holding the bow and arrows in your hands.
During combat, characters will follow your fighting instructions and generally act on their own initiative. You only have control, then, over the inventories and spell books of the characters in your party. The party leader will not participate in the attack while you are examining an inventory or selecting a spell. You can change the party leader and marching order during combat and you can always try to escape. The party will continue to fight until all your characters die or your enemies die or flee. During a fight, missile weapons can only be launched by characters occupying the two rear positions in the march. Strikes can only be launched by characters occupying the two front marching positions. Spells can be cast from any position.
Combat situation display
Any time the party takes damage, the damage done is displayed on the character’s flashing Shield icon. The situation screen will turn into a series of vertical bars showing the damage level of each party member. This screen can also be viewed at any time during the game by clicking on the group leader’s image. The damage done by the group is displayed in the two message windows with a small Stick icon to aid identification. The damage done by the group leader is shown in the small message window of the three-dimensional display.
Communicating with other characters
If you click on the situation panel, you will greet any character directly in front of you. The options are:
OFFER: Offer an item at the transfer dealer that you want to trade or sell. This is also used to offer gold during a purchase. The command can be used more than once during the transaction. For example, if a monster says no to your offer of gold, then you can offer him more or less. This also works with items for which you can offer another item. If you are not buying, selling or trading something, then the items being offered are presented as a gift.
PURCHASE: Ask if a monster or character has something to sell.
EXCHANGE: Used to determine what items a monster or character is carrying and whether or not they want to trade.
SELL: Offer an item at your transfer dealer for sale.
YES & NO: These icons are used to answer questions.
Various commands
These are accessed at the same time as the communication menus by clicking on the status panel.
Exit
The exit icon is used to exit the communication menu you are in.
Disc operations
If the disc icon is pressed by both players (in a two-player game), the current game can be saved or an old game can be restored.
Pause
If you click on the pause icon, the game will be suspended for both players until the pause icon is clicked again.
Dream
If you click on the sleep icon, you put the party to sleep. This speeds up the recovery of hit points, vitality points and spell points. Sleep can be improved by facing a bed by clicking on the icon. Sleep is very important. Characters only gain experience levels during sleep, as well as new spells. It is generally a good idea to sleep after a battle.
Tips and suggestions
At the outset
When you first play BLOODWYCH, take the time to experiment with the game controls. Try using the different icons and menus and notice the different effects the spells have. If you spend some time getting to know the more advanced features of BLOODWYCH, you will find it easier to progress when you play the game for real.
Always have a map. Without one you are quite likely to get lost. Indicate doors and rooms on it. If you leave an object or character behind you, mark the location on the map. It is also a good idea to mark the position of any pits or traps you pass through, so that you can avoid them in the future.
Combat
Always keep an eye on the hit points of your party members and be prepared to move someone behind the party or run away to recover. It is generally a good idea to have the main spell caster as the group leader during a fight, and have them at the rear of the group. This way, he or she can cast some prepared spells before combat begins, because your characters’ first action will be to cast whatever spells they have prepared.
Magic
Try to have a good colour balance in your party. As a character will be better at casting spells of their own alignment, have weaker spell casters (such as Rhombus or Diamonds) learn spells of their colour first. Particularly useful spells should be learned by everyone. Don’t be afraid to use magic, you can only get better.
Group management
Commending and correcting will directly affect how a party member behaves during combat. If you have a special role for a character, make sure your commendation or correction is appropriate before they join the fight, as it is not possible to do the same during the fight.
Psychological types of characters
The Rhombos are the warriors of BLOODWYCH. They can use any weapon, armour or shield. They generally have more hit points and strength than the other characters, but are not very good with magic.
Shamrocks are the wizards of BLOODWYCH. Although weak at low levels, they quickly become strong as they learn spells and gain experience. At high levels, Shamrocks are formidable opponents.
The Hearts are competent in all disciplines. They are all-round men. They also have much more pleasant personalities than the other psychological types, which makes them better businessmen.
Diamonds’ skills lie in the areas of stealth, archery and observation. If they attack an enemy from behind, they will do a lot of damage, considering that they use a weapon well suited for an assassin. You will usually notice things with them, if a Diamond is the leader of your group, that would otherwise go unnoticed.
General
Don’t be too quick to discard an item that is no longer needed, as most things can be sold or traded.
Within the wards there are Regeneration Rooms. These magical places will bring a dead character back to life. Try to find them quickly and remember where they are.
Don’t rush into killing things – it’s not easy if it’s a monster you know!
When you are trading, you will find it necessary to keep your inventory in sight.
Try not to be too greedy in the two-player game. If you argue a lot about something, try to resolve it before you end up killing each other!
BLOODWYCH is a long and sophisticated adventure. It is almost certain that you will not complete it in a single session. You can easily save your position in the game by clicking on the disc icon. The next time you load BLOODWYCH you can return to the position you saved and continue from that point. You will also find it useful to save the game at regular intervals while you are playing. This way no disaster will befall you, such as a power cut, which would destroy your entire party!
© 1989 MIRRORSOFT LTD.
Bloodwych
Spectrum, amstrad, commodore
Instrucciones
BLOODWYCH es un sofisticado juego de aventura que utiliza todas las funciones más avanzadas de tu ordenador. BLOODWYCH ha costado mucho tiempo y esfuerzo. Una experiencia única en los juegos de aventura de ordenador que comprende:
* Un avanzado sistema de interacción entre los personajes que te permite comunicarte completamente con las otras criaturas y gentes del juego.
* Sofisticados sistemas de lanzamiento de hechizos y de combate que aumentan la realidad del juego.
* Un sistema de iconos muy fácil de usar.
* Visión en tres dimensiones.
* Y muchas cosas más…
Este librito contiene información e instrucciones completas para jugar a BLOODWYCH, lo que te permite empezar rápidamente a jugar y disfrutar del juego. Al final del librito encontrarás algunos consejos para aprovechar al máximo BLOODWYCH. Estos te ayudarán a entrar con facilidad en los aspectos más avanzados del juego. Ahora pasa a la página siguiente, porque tu aventura empieza…
Instrucciones de carga
Commodore C64 (128 en el modo 64)
Disco: Teclea LOAD”*”,8,1 y pulsa RETURN.
Cinta: Para cargar, pulsa las teclas SHIFT + RUN STOP al mismo tiempo.
Amstrad CPC
Disco: Para cargar, teclea RUN”DISC.
Cinta: Para cargar, teclea 1 TAPE (en los ordenadores basados en disco). Pulsa las teclas CONTROL + ENTER al mismo tiempo.
Spectrum
Disco + cinta (128 K). Selecciona la opción LOADER desde el menú de título. El juego funcionará automáticamente.
48 K: Para cargar, teclea LOAD”” y pulsa ENTER.
La leyenda de bloodwych
Desde hace mucho tiempo era costumbre entre las gentes de Trazere relatar las leyendas más antiguas. Como la de Bloodwych, la orden secreta de los Magos Psíquicos. Se cuenta que hace muchos eones la orden de Bloodwych reinó sobre la antigua y poderosa ciudad de Treihadwyl. Allí dirigían en secreto los asuntos de la tierra de Trazere castigando y premiando a sus ciudadanos y comunicándose con los elementos en su nombre. Durante muchos siglos, las gentes de Trazere vivieron respetando a Bloodwych, porque mientras reinaron la tierra estaba a salvo. A salvo, eso es, hasta un negro amanecer mucho antes de que el tatarabuelo de tu abuelo fuera concebido.
Entonces había entre los Bloodwych un Zendick, el segundo en poder, y artes místicas después del Gran Dragón. Pero, a pesar de todo su poder y sabiduría, Zendick era una criatura guiada por la ambición y la avaricia. No estaba satisfecho viviendo a la sombra del maestro de los magos, de forma que rechazó las leyes de Bloodwych y se dedicó a las artes negras y malignas. Después de muchos años de diabólica conspiración, Zendick estaba finalmente listo para atreverse con el golpe que tanto había soñado y ese día invocó a las fuerzas de la oscuridad y destruyó al Gran Dragón, líder de Bloodwych.
Sus hermanos de Bloodwych no estaban preparados para este violento ataque y por ello no pudieron resistirse a Zendick, que los desterró para siempre al plano astral. Se cuenta que la malvada risa de Zendick se pudo oír resonando a través de toda la tierra ese amanecer. Durante todo el día y la noche se oyó su risa y al día siguiente los cielos se oscurecieron y llovió sangre y la tierra se abrió y fueron muchos los buenos ciudadanos de Trazere de los que nunca más se supo.
Se cuenta, entonces, que durante las lunas que siguieron, Zendick llamó a Treihadwyl a muchas criaturas de la noche y la buena gente de allí no se atrevió a salir después de que el sol se pusiera. Y lentamente la ciudad de los magos se transformó. Las criaturas aparecieron sobre sus murallas y sus torres prohibidas y dejaron caer dentro de ellas grandes cristales que lentamente absorbieron la energía y las formas de vida de la Tierra. Con esta energía, Zendick intentó invocar al Señor de la Entropía, la encarnación del caos puro, que disolvería al universo en los elementos de los que se formó. Entonces, Zendick, él solo, sería capaz de recrear el mundo a su propia imagen. El caos no dejaría nada más que los cristales de los que nació.
Cada año que pasaba, la tierra de Treihadwyl se volvía más desolada y fría. La ciudad por sí sola parecía irradiar el mal, infectando a todo aquel que se abandonara a su influencia. Trazere y sus gentes no eran sino una sombra de todo lo que habían sido antes, y el nacimiento de cada niño y la recogida de las cosechas se convirtieron en ocasiones para llorar y no para el regocijo. Una vez una gran muchedumbre, armada con poco más que su determinación, marcharon a la ciudad con la intención de poner fin a la plaga que había arruinado sus vidas. Sólo regresaron los hombres, medio muertos de hambre y con sus carnes quemadas y desnudas. Apenas tuvieron tiempo de nombrar los horrores que habían visto antes de que su último aliento escapara de sus cuerpos y sus almas se unieran a aquellas de sus camaradas muertos.
Ahora, mientras escribo esta historia de horror, no encuentro ninguna razón más para vivir. La enfermedad y la desesperación han penetrado en la tierra y el placer por la vida que nuestros padres tenían nunca será disfrutado por sus hijos. Todo lo que queda es rezar. Rezar para que un día Bloodwych vuelva y nos vengue.
Helveth Sharpquill, Escribano. Escrito por su propia mano en este decimotercer día de Seth, en el año cuatro mil ochenta y uno de la oscuridad.
…En algún lugar, allá en lo profundo del reino de las almas, una mente asomaba llamando a sus compañeros hacia ella. Sin ser advertidos, como el viento, los espíritus de muchos se reunieron. Aunque no tenían forma, las mentes se encadenaron compartiendo sus pensamientos con los demás. No se pronunció una palabra, no hubo ningún sonido, pero dentro del vacío astral un pensamiento tomó forma.
“Somos Bloodwych, magos inmortales en busca de la luz. Hermanos, no debemos ser vencidos. La magia negra de Zendick ha crecido demasiado. Debe ser destruido, y el momento apropiado es ahora. La influencia de Zendick es ahora muy fuerte. El Señor de la Entropía está acumulando su poder y muy pronto empezará la plaga de su destrucción. Si no lo devolvemos al reino del caos, todo estará perdido…”
“Saldar y Vestryl, tenéis a vuestro cargo la tarea más importante que jamás ha tenido Bloodwych. Debéis encontrar a los últimos dieciséis campeones de Trazere y unir vuestras mentes con lo dos más valerosos. Entonces, para salvar al universo, debéis conducirlos al corazón de Treihadwyl y una vez allí encontrar y destruir los cristales acumuladores. Id ahora y el espíritu de Bloodwych estará con vosotros…”
Murlock Darkheart se despertó en la penumbra de un frío pasadizo. Gimió mientras se sentaba con los ojos empañados de dolor. Inmediatamente recordó la noche anterior. Era extraño que tantos aventureros hubieran llegado a la misma taberna solitaria en una sola tarde. Esa, se prometió a sí mismo, sería la última vez que una gota de aguamiel entrase por sus labios. ¿Cómo era posible que un mago digno como él hubiera acabado de juerga con vulgares matones? Nunca más podría mirar a los ojos a sus camaradas de hechizos.
Aunque en ese momento su principal preocupación era salir de ese sucio agujero al que había caído en su borrachera. A medida que caminaba, el corazón de Murlock empezó a hundirse. Parecía que los corredores nunca se acababan, enlazándose con los otros como un enorme laberinto. Empezaba a preguntarse si su destino era el de convertirse en pasto de las ratas en aquel lugar dejado de la mano de Dios. En ese momento vislumbró algo moviéndose por encima de su cabeza. Y cuando dobló una esquina, tuvo la certeza de que había visto una figura asomando en la oscuridad. Sus ojos no le engañaban, era uno de los aventureros con los que se encontró en la taberna la noche anterior.
Darkheart estaba a punto de alcanzarle, cuando tuvo una súbita náusea y cayó al suelo. Su cabeza parecía a punto de explotar y estaba confundido por las extrañas visiones de cosas desconocidas para él. Pero el dolor desapareció. El malestar remitió y fue reemplazado por una presencia reconfortante. Cuando se recuperó, Darkheart se dio cuenta de que algo muy extraño le había ocurrido, pero no tenía miedo… Bloodwych estaba con él.
Como jugar a bloodwych
Tú eres uno de los Bloodwych. Debes de tomar el papel de uno de los dieciséis campeones de Trazere. Primero debes de explorar Treihadwyl reclutando más campeones y recogiendo objetos para ayudarte en tu tarea. Una vez que estés preparado, debes coger los cuatro cristales acumuladores de las torres. Llévalos a la quinta torre y allí destruye a Zendick y destierra al Señor de la Entropía al reino del caos. Para hacer esto tendrás que vencer a los agentes de Zendick. El Señor de la Entropía ha transformado a muchos de los ciudadanos de Trazere en extraños monstruos y ha corrompido las mentes de la mayoría de ellos, convirtiéndolos en asesinos psicópatas. Algunos de estos ciudadanos te ayudarán, pero muchos intentarán destruirte. Buena suerte en tu misión y recuerda: el espíritu de Bloodwych estará siempre contigo.
BLOODWYCH se juega usando el teclado o joystick, que imita las funciones del controlador del ratón de tu ordenador. El Amstrad y el Spectrum te ofrecen la oportunidad de definir las funciones del teclado; si quieres usar el joystick, selecciona esta opción y empuja tu joystick cuando se te indique. La mayoría de las funciones de BLOODWYCH se activan mediante el joystick, moviendo un indicador (en forma de pequeña flecha) sobre el icono y luego pulsando el botón de fuego para activar ese icono. El indicador del jugador 1 es azul y el del jugador 2 es rojo.
Los personajes
La página de selección de personajes (ver figura 1) muestra los dieciséis campeones disponibles. Para inspeccionar un campeón pulsa en el Escudo que representa a ese personaje. Entonces aparecerá el campeón en una de las Cajas de los Jugadores, a la derecha de la pantalla, junto con sus atributos, que se muestran en la Ventana de los Personajes.
Pulsa en el icono de la Bolsa para ver el inventario del personaje. El icono de la Bolsa se convertirá ahora en un libro. Pulsa en éste para volver a la Ventana del Personaje. Dirígete a la sección de hechizos y al inventario para la explicación de estas pantallas.
Si ahora quieres ver a otro campeón, puedes hacerlo pulsando en el Escudo apropiado. Podrás ver cuantos campeones quieras de esta manera. Cuando hayas escogido a un campeón adecuado, pulsa en el icono del Palo (las cartas de juego) para confirmar tu elección. Cuando ambos jugadores (en un juego de dos jugadores) hayan seleccionado a sus campeones, el juego comenzará. Asegúrate de que seleccionas a los campeones que quieres coger, ya que no los encontrarás de nuevo. Cada jugador puede seleccionar hasta cuatro campeones para formar un equipo.
Tipos psicológicos
Hay cuatro tipos psicológicos, cada uno indicado por un tipo de cartas. Cada tipo psicológico tiene diferentes puntos fuertes y puntos débiles. Los tipos son:
Luchadores, buenos en el combate: Rombos.
Magos, excelentes lanzando hechizos: Tréboles.
Aventureros, completos y diplomados: Corazones.
Arqueros/asesinos: Diamantes.
Figura 1: seleccionando al campeon
Iconos de los campeones
Campeón seleccionado
Pergamino del personaje
Ventana de los iconos
Palo del campeón (tipo)
Nombre del campeón
Cualquier tipo psicológico puede intentar y realizar acciones asociadas normalmente con otro tipo. Sin embargo, pueden no adaptarse bien.
Cualidades de los personajes
Si pulsas en el icono del Pergamino (figura 2), traerás el pergamino del personaje que hayas seleccionado. Este muestra las siguientes cualidades del personaje:
NIVEL: Esto es una indicación de la experiencia del personaje. Afecta a todas sus habilidades básicas y especiales. Cuanto más alto sea tu nivel, más competente eres en todo.
FUERZA: Esto afecta a la facilidad con que golpees durante un combate y cuánto daño puedes hacer a tu oponente.
AGILIDAD: Esto también afecta a tu habilidad en el combate, así como tu habilidad para esquivar los ataques.
INTELIGENCIA: Esto limita el número de puntos de hechizos que tienes.
CARISMA: Esto es una indicación de cuánta influencia tienes sobre otros personajes.
PUNTOS POR GOLPES: Esto te muestra cuánto daño puedes soportar antes de morir. Los puntos por golpes se pueden restablecer con las pociones adecuadas, hechizos, o descansando. La primera figura muestra tus puntos por golpes en el momento, mientras que la segunda figura muestra el número máximo de puntos por golpes que puedes alcanzar.
VITALIDAD: Esto es una indicación de la cantidad de energía que tienes. Si tu vitalidad desciende hasta cero, empezarás a sufrir daños. Las pociones y los hechizos pueden usarse para ayudarte a recuperar tu vitalidad. Al igual que con los puntos por golpes, la primera figura te muestra tu vitalidad en ese momento, mientras que la segunda te muestra tu vitalidad máxima.
COMIDA: Esta barra te muestra lo bien alimentado que está un personaje. Si la barra es corta, el personaje está hambriento y necesita comida cuanto antes. El nivel de comida influye en la velocidad para recuperar la vitalidad.
Pulsa una vez en algún lugar de la pantalla para volver a la pantalla principal de control. Las cualidades importantes del líder en ese momento se muestran también en la caja de estadísticas situada a la derecha del icono del líder. Las tres barras en esta caja muestran, de arriba abajo: puntos por golpes, vitalidad y puntos por hechizos.
Moviendo a los personajes
Cuando en BLOODWYCH te mueves o realizas una acción importante, el líder seleccionado del grupo es el que realiza la acción. Los otros miembros del grupo responden a su propia iniciativa. El líder del momento se señala por una caja alrededor de su icono del Palo (figura 2). Para cambiar al líder, simplemente pulsa dos veces en el icono del Palo apropiado. Fíjate en que el líder no tiene necesariamente que estar al frente del grupo.
En cualquier momento es posible cambiar el orden de la marcha del grupo. Para hacer esto, simplemente pulsa una vez en la nueva posición y el orden de marcha cambiará apropiadamente.
El movimiento se consigue pulsando en el icono del movimiento apropiado (figura 2). Fíjate en que los giros a la izquierda o a la derecha hacen que tu personaje gire 90° en el punto, mientras que un paso a la izquierda o un paso a la derecha hacen que tu personaje se mueva a la derecha o a la izquierda sin mirar en esa dirección.
Figura 2: la pantalla principal
Icono del líder
Panel del nivel
Giro a la izquierda
Paso adelante
Giro a la derecha
Nombre del personaje
Icono del libro
Icono del pergamino
Icono de la puerta
Icono de la bolsa
Icono del palo
Líder del momento
Escudos del grupo
Visión perspectiva en tres dimensiones
Paso a la izquierda
Paso atrás
Paso a la derecha
Icono de defensa
Icono del golpe
Cuando se activa un icono de movimiento, éste parpadeará brevemente y tu personaje se moverá de la forma apropiada. Si intentas moverte a un lugar que ya está ocupado, por un pilar u otro personaje, por ejemplo, el icono parpadeará, pero el movimiento no se producirá.
Escaleras
Para ascender o descender por escaleras, simplemente pisa en ellas. No es necesario estar de cara a la escalera para hacer esto. Si giras en una escalera, te moverás arriba o abajo, dependiendo de si estabas al principio o al final.
Puertas
Las puertas se pueden abrir o cerrar pulsando el icono de la Puerta (figura 2) o pulsando en la puerta de la ventana de tres dimensiones. Si has lanzado previamente un hechizo continuo o si hay un hechizo esperando para ser lanzado, entonces el icono de la Puerta se ocultará por el icono del hechizo. Para usar el icono de la Puerta es necesario anular primero el hechizo. Si intentas abrir una puerta cerrada, aparecerá la palabra “LOCKED”. Las puertas cerradas se pueden abrir con la llave o el hechizo apropiado. En las secciones de hechizos y el inventario te explica cómo hacerlo.
Hechizos
Si pulsas en el icono del Libro, aparece el Libro de los Hechizos (figura 3). Si pulsas en las flechas que hay encima del libro, las páginas se volverán hacia delante o hacia atrás. Si pulsas en la doble flecha central, el libro se cerrará y volverás a la pantalla de control principal.
Preparando hechizos
Para preparar un hechizo, primero debes pulsar en uno de los cuatro “runes” que aparecen en cada página. Sólo se pueden seleccionar los hechizos conocidos, y éstos se colorean después de sus alineaciones mágicas (verde, azul, rojo o amarillo). Un hechizo no conocido todavía estará en gris y no puede ser seleccionado. El hechizo seleccionado se identifica bajo el libro de hechizos por su nombre, color y lo que vale. Si no hay ningún hechizo preparado, el área de debajo del libro tendrá estrellas grises y no habrá ningún nombre de hechizo allí.
Figura 3: el libro de hechizos
Girar las páginas hacia delante
Cerrar el libro
Girar las páginas hacia atrás
Runes
Icono Estrella
FIREBALL Valor
Baja el valor
Aumenta el valor
El valor del hechizo seleccionado se puede alterar pulsando en las flechas que hay al lado del valor en ese momento. Si elevas el valor de un hechizo, su poder aumentará, así como su porcentaje de lanzamiento, pero también disminuirán tus puntos de hechizo. Si bajas el valor del hechizo, usarás menos puntos de hechizo, pero disminuirá su poder o su porcentaje de lanzamiento. Tus puntos de hechizo en ese momento o el máximo de ellos se muestran bajo el hechizo. Si el hechizo tiene éxito, aumentará tu habilidad con ese hechizo, lo que hará que sea más barato y/o más poderoso en futuros lanzamientos. Un hechizo que ha sido preparado puede esperar mientras que sea lanzado o se seleccione otro o el grupo duerma.
Lanzando hechizos
Un hechizo se lanza pulsando en los iconos Estrella, que están a cada lado del nombre del hechizo. Si el libro de hechizos está cerrado antes de que se lance un hechizo preparado, entonces el icono de la Puerta se reemplazará por un icono Estrella, que también se puede usar para lanzar el hechizo. Si el personaje tiene un hechizo preparado cuando entra en combate, entonces el hechizo se lanzará primero automáticamente. Un personaje no puede lanzar un hechizo que requiere más puntos de los que él o ella tiene disponibles. Un hechizo con un porcentaje bajo puede fallar, y esto se indicará mediante el mensaje adecuado. Después de lanzar el hechizo, el personaje sufrirá una penalización temporal en todos los hechizos mientras se recupera del esfuerzo de lanzamiento. Este tiempo de recuperación es más largo para los hechizos de alto nivel.
Efecto de los hechizos
Todos los hechizos tienen efectos variables, que son la combinación de tu habilidad como mago, la energía que gastas en un hechizo, tu experiencia con el hechizo lanzado y la suerte. La barra del porcentaje del hechizo da una indicación clara de si estás preparado para lanzar un hechizo con éxito. Una vez que tu habilidad para lanzar hechizos alcanza el 100% el efecto de los hechizos empieza a hacerse más fuerte.
Hechizos continuos
Algunos hechizos tienen un efecto continuo. Cuando son lanzados, un icono que representa el hechizo reemplaza al icono de la Puerta. El hechizo se puede cancelar pulsando en este icono. No se pueden lanzar otros hechizos cuando se está usando un hechizo continuo. Si se lanza otro hechizo desde el libro de hechizos cuando hay un hechizo continuo en uso, entonces éste cancelará el hechizo continuo. Puedes tener otro hechizo preparado mientras el hechizo continuo está funcionando. El hechizo preparado se puede lanzar desde el libro de hechizos o cancelando el hechizo continuo para descubrir el icono de la Estrella en el panel principal.
Especialización
Todos los personajes están especializados en uno de los colores de la magia de acuerdo con su alineación. Esto se indica por el color del icono del Palo en un Escudo. Los hechizos de color natural son más fáciles de lanzar y más eficaces y efectivos que los hechizos de otro color. Cada color mágico representa una esfera diferente de influencia:
Verde (Magia de la Serpiente): Representa lo psíquico.
Azul (Magia de la Luna): Representa la mente y la ilusión.
Rojo (Magia del Dragón): Es el uso de fuego y energía.
Amarillo (Magia del Caos): Afecta la naturaleza de la magia y de la vida.
Adquisición de hechizos
Los rombos y los diamantes reciben un nuevo hechizo cada segundo nivel. Los corazones reciben uno por cada nivel y los tréboles dos por nivel. Los nuevos hechizos se aprenden durante el sueño, cuando el personaje es visitado por las Hadas de los Hechizos. Una de las Hadas de los Hechizos visitará al personaje durante el sueño y le ofrecerá un hechizo, siempre que el personaje pague dicho hechizo. Si no estás contento con el que te ofrece, entonces recházalo y probablemente te ofrecerá uno diferente la próxima vez que el personaje esté durmiendo. Si escoges pagar al Hada de los Hechizos, entonces el hechizo se añadirá a tu libro, listo para usarlo.
Aquí hay una breve descripción de los 32 hechizos:
Hechizos serpiente (serpent spells)
Armadura (armour): Luce este hechizo con orgullo.
Paralizar (paralyze): Una vida congelada puede ser muy corta.
Brújula (compass): Nunca te pierdas de nuevo.
Levitar (levitate): Un hechizo genuinamente ligero.
Potencia guerrera (warpower): Puedes tener la fuerza de 10.
Renovar (renew): Cura todo, excepto los calambres.
Tornillo de arco (arc bolt): Una experiencia electrificante.
Formar pared (formwall): Para aquellos a los que les encanten las paredes.
Hechizos de luna (moon spells)
Engañar (beguile): Cubre la lengua con plata.
Confundir (confuse): No sabrán qué es lo que les ha golpeado.
Ocultar (conceal): Lo que no se puede ver, no se puede robar.
Desvanecer (vanish): Ahora me ves… ahora no me ves.
Visión real (truview): Nunca más pierdas al escondite.
Ilusión (ilusion): Suficientemente real como para hacer daño.
Mente de piedra (mindrock): Para aquellos que piensan que les encantan las paredes.
Viento de bruja (wychwind): Simplemente, haz que vuelen.
Hechizos de dragon (dragon spells)
Misil (missile): Uno en el ojo para los arqueros.
Cierre mágico (magelock): Para qué molestarse con todas esas llaves.
Vitalizador (vitalise): Nunca te has encontrado tan bien.
Quitar hechizo (dispell): Lo que la magia hace, la magia deshace.
Bola de fuego (fireball): Una bomba para los grupos.
Recargar (recharge): Carga los poderes de los anillos.
Camino de fuego (firepath): Descansa en una alfombra roja.
Llamarada (blaze): Nadie puede cruzar esa salvaje ráfaga.
Hechizos de sombra (shadow spells)
Terror (terror): ¡Uuuuh!
Desviar (deflect): Un hechizo al día mantiene las flechas en la lejanía.
Alquimia (alchemy): La mano de Midas.
Antimagia (antimage): Nunca más te preocupes por los que usan la magia. Golpe mágico (spelltap): La perdición de los que usan la magia.
Convocar (summon): Nunca caminarás solo.
Vivificar (vivify): Hace que la muerte parezca un inconveniente mesolo
Interrumpir (disrupt): Conocida por algunos como “golpe mortal”.
El inventario y la manipulacion de objetos
Si pulsas en el icono del Inventario (figura 2) traerás la pantalla del inventario (figura 4). El inventario de cada personaje muestra doce distribuidores de iconos (diez en Spectrum). Los cuatro primeros distribuidores son para un objeto que se sostenga en la mano izquierda, un objeto que se sostenga en la mano derecha, la armadura que se lleve y el escudo.
Figura 4: el inventario
Nombre del personaje
Distribuidor de la mano
Distribuidor de armaduras
Distribuidor de escudos
Distribuidores de mochilas
Personaje
Iconos del palo del personaje
Distribuidor de transferir/usar Icono de salida
Indice de protección
Las clases de Tréboles y Diamantes sólo pueden ser escudos pequeños. Los ocho distribuidores que quedan son mochilas. Debajo de estos distribuidores está el índice de protección que el personaje tiene en ese momento. Esto indica la efectividad con que la armadura está absorbiendo los golpes. Cuanto más bajo es el número, más efectiva es la armadura. Debajo de esto están los iconos del Palo del grupo. El inventario del personaje que se muestra en un momento dado está rodeado por una caja. Los dos iconos finales son para el distribuidor de transferir/usar y luego el icono de Salida. Si pulsas en este último icono, volverás a la pantalla de control principal.
Seleccionando un inventario
Para seleccionar el inventario de un personaje, simplemente pulsa en el icono del Palo apropiado. El nombre del personaje se mostrará en la parte superior de la pantalla y aparecerá su inventario.
Usando el distribuidor para transferir
Si pulsas en cualquier objeto del inventario, el objeto se moverá al distribuidor de transferencia, donde se puede manipular fácilmente. De igual forma, si pulsas en un distribuidor vacío del inventario, cualquier objeto que esté en el distribuidor de transferencia se moverá al distribuidor vacío. Los distribuidores de las manos son para cualquier cosa, pero las armas, anillos, varitas y bastones sólo son útiles cuando los pones aquí. El distribuidor de la armadura es para los objetos que se llevan, el distribuidor del escudo es para los escudos y los distribuidores de las mochilas son para cualquier cosa.
Para intercambiar un objeto en el inventario por un objeto en la zona de transferencia, simplemente pulsa el botón del inventario y se intercambiarán.
Para dejar un objeto en la zona de transferencia, simplemente pulsa en el lugar de la pantalla de tres dimensiones donde quieras dejarlo. De igual manera, para recoger un objeto pulsa en el objeto y se moverá al distribuidor de transferencia. Si ya hay algo en el distribuidor de transferencia, el objeto se dejará.
Flechas, teclas comunes y monedas
Estos objetos se muestran con un número que indica cuántas hay. Si pulsas una vez, moverás el objeto a la zona de transferencia. Si después pulsas más veces en el distribuidor de transferencia, moverás más.
Moviendo objetos entre personajes
Para transferir objetos de un personaje a otro mueve el objeto al distribuidor de transferencia y después selecciona el personaje que lo va a recibir y mueve el objeto a un distribuidor vacío en su inventario.
Usando un objeto
Para usar un objeto, como comida, bebida o pociones, pon el objeto en el distribuidor de transferencia y después pulsa en él. Los consumirá el personaje cuyo inventario esté viendo en ese momento. Cuando un objeto de comer o beber esté en el distribuidor de transferencia, el nivel de comida de ese personaje se muestra en la ventana para mensajes, que está bajo la ventana de tres dimensiones, para tener una fácil referencia.
Las espadas y otro tipo de armamento deben de ser llevados por el personaje en un distribuidor de la mano, si los va a usar. Esto también sirve para los bastones, varitas y anillos. Un objeto puede estar en cualquiera de los dos distribuidores de las manos, pero si en las dos manos hay armas para luchar se usará la que está en la mano izquierda. Si un personaje quiere usar un arco en el combate, ambos, el arco y las flechas, estarán en los distribuidores de las manos.
Desvalijando a los personajes muertos
Si un miembro del grupo está con el grupo en el momento de su muerte, entonces se puede seguir accediendo a su inventario. Si el miembro del grupo estaba lejos de él en el momento de su muerte, entonces el cuerpo debe de ser recuperado antes de que pueda acceder al inventario. No puedes acceder a los inventarios de los personajes muertos que no sean miembros de tu grupo.
Combate
El combate se produce cuando tu grupo se encuentra con criaturas hostiles o cuando el grupo inicia un ataque a una criatura. El combate puede tomar seis iniciativas de acción:
1. NO HACER NADA (esto no se recomienda).
2. RETIRARTE: Moviéndote rápidamente fuera del alcance de tu adversario.
3. ATACAR: Pulsando en el icono de Golpe.
4. DEFENDERTE: Pulsando en el icono de Defensa (esto es útil si necesitas realizar una acción como reordenar el orden de la marcha).
5. LANZAR UN HECHIZO (ver la sección de hechizos).
6. DISPARAR UN MISIL: Pulsando en el icono de Golpear mientras tienes el arco y las flechas en tus manos.
Durante el combate, los personajes seguirán tus instrucciones de lucha y generalmente actuarán por su propia iniciativa. Sólo tienes el control, entonces, sobre los inventarios y los libros de hechizos de los personajes de tu grupo. El líder del grupo no participará en el ataque mientras estás examinando un inventario o seleccionando un hechizo. Puedes cambiar al líder del grupo y el orden de la marcha durante el combate y siempre puedes intentar escapar. El grupo continuará luchando hasta que todos tus personajes mueran o tus enemigos mueran o huyan. Durante una pelea, las armas misil sólo se pueden lanzar por los personajes que ocupan las dos posiciones de retaguardia en la marcha. Los golpes sólo se pueden lanzar por personajes que ocupen las dos posiciones frontales de marcha. Los hechizos se pueden lanzar desde cualquier posición.
Pantalla de la situación del combate
En cualquier momento que el grupo sufra daños, el daño realizado se muestra en el icono del Escudo del personaje, parpadeando. La pantalla de la situación se convertirá en una serie de barras verticales que muestran el nivel de daño de cada miembro del grupo. Esta pantalla también se puede ver en cualquier momento durante el juego pulsando en la imagen del líder del grupo. El daño que se hace por el grupo se muestra en las dos ventanas de mensajes con un pequeño icono del Palo para ayudar a la identificación. El daño hecho por el líder del grupo se muestra en la pequeña ventana de mensajes de la pantalla de tres dimensiones.
Comunicandote con otros personajes
Si pulsas en el panel de situación, saludarás a cualquier personaje que esté directamente enfrente de ti. Las opciones son:
OFERTA (OFFER): Ofrece un objeto en el distribuidor de transferencia que quieras cambiar o vender. Esto también se usa para ofrecer oro durante una compra. El comando se puede usar más de una vez durante la transacción. Por ejemplo, si un monstruo dice que no a tu oferta de oro, entonces puedes ofrecerle más o menos. Esto también funciona con objetos por los que puedes ofrecer otro objeto. Si no estás comprando, vendiendo o comerciando con algo, entonces los objetos que se ofrecen se presentan como un regalo.
COMPRA (PURCHASE): Pregunta si un monstruo o personaje tiene algo para vender.
CAMBIO (EXCHANGE): Se usa para determinar qué objetos lleva un monstruo o un personaje y si quiere o no comerciar.
VENDER (SELL): Ofrece un objeto en tu distribuidor de transferencia para vender.
SI y NO (YES & NO): Estos iconos se usan para responder a preguntas.
Comandos diversos
Se accede a éstos al mismo tiempo que a los menús de comunicación pulsando en el panel de situación.
Salida
El icono de salida se utiliza para salir del menú de comunicación en el que estés.
Operaciones con el disco
Si el icono del disco se pulsa por ambos jugadores (en un juego de dos jugadores), el juego en curso se puede salvar o restablecer un juego antiguo.
Pausa
Si pulsas en el icono de la pausa, el juego se suspenderá para ambos jugadores hasta que se vuelva a pulsar el icono de la pausa.
Sueño
Si pulsas en el icono de sueño, haces que el grupo duerma. Esto acelera la recuperación de los puntos de golpes, de vitalidad y de hechizos. El sueño se puede mejorar si se está de cara a una cama pulsando el icono. El sueño es muy importante. Los personajes sólo ganan niveles de experiencia durante el sueño, al igual que nuevos hechizos. Generalmente es una buena idea dormir después de una batalla.
Consejos y sugerencias
Al empezar
Cuando juegues por primera vez a BLOODWYCH, tómate tu tiempo para experimentar con los controles del juego. Intenta usar los diferentes iconos y menús y fíjate en los diferentes efectos que tienen los hechizos. Si empleas algún tiempo en intentar conocer las características más avanzadas de BLOODWYCH, encontrarás más fácil el progresar cuando juegues en serio.
Hazte siempre un mapa. Sin uno es bastante posible que te pierdas. Indica en él las puertas y habitaciones. Si dejas un objeto o personaje detrás de ti, marca el lugar en el mapa. También es una buena idea el marcar la posición de cualquier pozo o trampa por las que pases, de forma que puedas evitarlas en el futuro.
Combate
Ten siempre un ojo puesto en los puntos de golpes de los miembros de tu grupo y estáte preparado para mover a alguien atrás del grupo o huir para recuperarte. Generalmente es una buena idea el tener al principal lanzador de hechizos como líder del grupo durante un combate, y tenlos en la retaguardia del grupo. De esta forma, él o ella pueden lanzar algunos hechizos preparados antes de que el combate empiece, porque la primera acción de tus personajes será lanzar cualquier hechizo que tengan preparado.
Magia
Intenta tener un buen equilibrio de color en tu grupo. Como un personaje será mejor en lanzar hechizos de su propia alineación, haz que los lanzadores de hechizos más débiles (como Rombos o Diamantes) aprendan primero los hechizos de su color. Los hechizos particularmente útiles deben de ser aprendidos por todo el mundo. No tengas miedo en usar la magia, sólo puedes mejorar.
Dirección del grupo
Encomendar y corregir afectará directamente a cómo se comporte un miembro del grupo durante el combate. Si tienes una función especial para un personaje, asegúrate de que tu recomendación o corrección es apropiada antes de que se una al combate, ya que no es posible hacer lo mismo durante la pelea.
Tipos psicológicos de los personajes
Los Rombos son los guerreros de BLOODWYCH. Pueden usar cualquier arma, armadura o escudo. Generalmente tienen más puntos de golpes y fuerza que los demás personajes, pero no son muy buenos con la magia.
Los Tréboles son los magos de BLOODWYCH. Aunque son débiles en los niveles bajos, rápidamente se hacen fuertes a medida que aprenden hechizos y ganan experiencia. En los niveles altos, los Tréboles son adversarios formidables.
Los Corazones son competentes en todas las disciplinas. Son hombres para todo. Además tienen personalidades mucho más agradables que los otros tipos psicológicos, lo que les hace mejores negociantes.
Las habilidades de los Diamantes se encuentran en las áreas del sigilo, el arco y la observación. Si atacan a un enemigo desde atrás, le harán mucho daño, teniendo en cuenta que utilizan un arma muy apropiada para un asesino. Normalmente notarás con ellos cosas, si un Diamante es el líder de tu grupo, que de otra manera te pasarían inadvertidas.
General
No descartes demasiado deprisa un objeto que no se necesite más, ya que la mayoría de las cosas pueden ser vendidas o cambiadas.
Dentro de las salas hay Habitaciones de Regeneración. Estos lugares mágicos devolverán a la vida a un personaje muerto. Intenta encontrarlas deprisa y acuérdate de dónde están.
No te precipites al matar cosas. ¡No es fácil si es a un monstruo que conoces!
Cuando estés comerciando, encontrarás necesario tener el inventario a la vista.
Intenta no ser demasiado avaricioso en el juego de dos jugadores. Si discutes mucho acerca de algún aspecto, ¡intenta resolverlo antes de acabar matándoos el uno al otro!
BLOODWYCH es una aventura larga y sofisticada. Es casi seguro que no la completarás en una sola sesión. Puedes salvar tu posición en el juego fácilmente pulsando en el icono del disco. La próxima vez que cargues BLOODWYCH podrás volver a la posición que salvaste y continuar desde ese punto. También encontrarás útil salvar el juego a intervalos regulares mientras estás jugando. De esta forma no te ocurrirá ningún desastre, como un corte de luz, ¡que destruiría a todo tu grupo!
© 1989 MIRRORSOFT LTD.
Ещё игры этого жанра


Сохранённые игры[X]
Справка[X]
Помощь уже в пути!
- x1
- x2
- x3
<<<<
<<<<
<<<<
Не забывайте периодически сохранять игровой прогресс на сервере (клавишей F8), чтобы уверенно продвигаться вперёд!
Если вы гость на сайте, то прогресс будет сохранён только в памяти браузера и потеряется при закрытии. Чтобы этого не произошло - просто войдите в свой профиль.
Для загрузки сохранённой игры жмите F3 или откройте меню "Диск" кнопкой на правой панели.
Если игра не запускается, или у вас есть вопросы по игре - задайте их ниже.

Не запускается или глючит игра, или не можете пройти? Спросите в комментариях.